Quantcast
Channel: NoSQL – Cloud Data Architect
Viewing all 521 articles
Browse latest View live

MySQL Connector/Python 8.0.22 has been released

$
0
0

Feed: Planet MySQL
;
Author: InsideMySQL.com
;

Dear MySQL users,

MySQL Connector/Python 8.0.22 is the latest GA release version of the
MySQL Connector Python 8.0 series. The X DevAPI enables application
developers to write code that combines the strengths of the relational
and document models using a modern, NoSQL-like syntax that does not
assume previous experience writing traditional SQL.

To learn more about how to write applications using the X DevAPI, see

http://dev.mysql.com/doc/x-devapi-userguide/en/

For more information about how the X DevAPI is implemented in MySQL
Connector/Python, and its usage, see

http://dev.mysql.com/doc/dev/connector-python

Please note that the X DevAPI requires at least MySQL Server version 8.0
or higher with the X Plugin enabled. For general documentation about how
to get started using MySQL as a document store, see

http://dev.mysql.com/doc/refman/8.0/en/document-store.html

To download MySQL Connector/Python 8.0.22, see the “General Availability
(GA) Releases” tab at

http://dev.mysql.com/downloads/connector/python/

Enjoy!

Changes in MySQL Connector/Python 8.0.22 (2020-10-19, General Availability)

Functionality Added or Changed

     * Added Django 3.0 support while preserving compatibility with
       Django 2.2. Removed support for Django 1.11 with Python 2.7.

     * Previously, the client-side mysql_clear_password authentication
       plugin was not supported. Now, it is permitted to send passwords
       without hashing or encryption by using mysql_clear_password on
       the client side together with any server-side plugin that needs a
       clear text password, such as for LDAP pluggable authentication.
       Connector/Python returns an exception if the mysql_clear_password
       plugin is requested but the connection is neither encrypted nor
       using Unix domain sockets. For usage information, see Client-Side
       Cleartext Pluggable Authentication
(https://dev.mysql.com/doc/refman/8.0/en/cleartext-pluggable-authentication.html).

     * Connections made using the MySQL Enterprise Edition SASL LDAP
       authentication plugin now are supported on Windows and Linux, but
       not on macOS. Connector/Python implements the SCRAM-SHA-1
       authentication method of the SASL authentication protocol.

     * The new compression-algorithms connection option sets the order
       by which supported algorithms are negotiated and selected to send
       compressed data over X Protocol connections. The algorithms
       available are specified by the server and currently include:
       lz4_message, deflate_stream, and zstd_stream. Supported algorithm
       aliases are lz4, deflate, and zstd. Unknown or unsupported values
       are ignored.  Example usage:
session = mysqlx.get_session({
    “host”: “localhost”,
    “port”: 33060,
    “user”: “root”,
    “password”: “s3cr3t”,
    “compression”: “required”,
    “compression-algorithms”: [“lz4′, “zstd_stream”]
})

     * For enhanced security of the existing allow_local_infile
       connection string option, the new allow_local_infile_in_path
       option allows restricting LOCAL data loading to files located in
       this designated directory.

     * Refactored the Connector/Python build system by removing
       artifacts of old implementations, improved debugging, and now
       statically link the C extensions. This also exposes the distutils
       commands, to allow the end-user build packages.

     * The pure Python and C extension implementations were combined
       into a single package; this applies to both DEB and RPM packages.

Bugs Fixed

     * Fixed a memory leak in the C-extension implementation when using
       the Decimal data type. Thanks to Kan Liyong for the patch.
       (Bug #31335275, Bug #99517)

     * Copyright and License headers were missing in the Python modules
       generated by protoc. (Bug #31267800)

     * When creating an index on a collection, if a collation was
       specified but the field is not of the type TEXT, then an error
       message was generated with a wrong field type.  It’d always
       report it as GEOJSON. (Bug #27535063)

     * The reset connection command was missing from the C-extension
       implementation, which is required to reuse a connection from the
       pool. As such, connection pooling is now allowed with the
       C-extension implementation. (Bug #20811567, Bug #27489937)

Enjoy and thanks for the support!

On behalf of the MySQL Release Team,
Nawaz Nazeer Ahamed


MySQL Connector/C++ 8.0.22 has been released

$
0
0

Feed: Planet MySQL
;
Author: InsideMySQL.com
;

Dear MySQL users,

MySQL Connector/Node.js is a new Node.js driver for use with the X
DevAPI. This release, v8.0.22, is a maintenance release of the
MySQL Connector/Node.js 8.0 series.

The X DevAPI enables application developers to write code that combines
the strengths of the relational and document models using a modern,
NoSQL-like syntax that does not assume previous experience writing
traditional SQL.

MySQL Connector/Node.js can be downloaded through npm (see
  https://www.npmjs.com/package/@mysql/xdevapi for details) or from
  https://dev.mysql.com/downloads/connector/nodejs/.

To learn more about how to write applications using the X DevAPI, see
  http://dev.mysql.com/doc/x-devapi-userguide/en/.
For more information about how the X DevAPI is implemented in MySQL
Connector/Node.js, and its usage, see
  http://dev.mysql.com/doc/dev/connector-nodejs/.

Please note that the X DevAPI requires at least MySQL Server version
8.0 or higher with the X Plugin enabled. For general documentation
about how to get started using MySQL as a document store, see
  http://dev.mysql.com/doc/refman/8.0/en/document-store.html.

Changes in MySQL Connector/Node.js 8.0.22 (2020-10-19, General Availability)

Functionality Added or Changed

     * Improved test execution configuration to better align
       with other connectors. For example, unified environment
       variable names (such as changing NODE_TEST_MYSQL_HOST to
       MYSQLX_HOST). See the Connector/Node.js documentation
       (https://dev.mysql.com/doc/dev/connector-nodejs/8.0/) for
       usage information.

Bugs Fixed

     * Non-BIGINT values stored in BIGINT columns were not
       decoded properly in result sets. (Bug #31686805, Bug
       #100324)

     * Fetched results from a SET column would only contain one
       value from the set. (Bug #31654667, Bug #100255)

     * Deprecated the dbPassword and dbUser property names;
       which were aliases to the password and user properties.
       Their usage now emits deprecation level errors. (Bug
       #31599660)

     * Added a SERVER_GONE error handler to avoid potential
       circular dependency warnings with Node.js >= 14.0.0. (Bug
       #31586107, Bug #99869)

     * Restricted the offset() method to the CollectionFind and
       TableSelect APIs, as described in the X DevAPI
       specification. Using offset() on other APIs yielded this
       error: “Error: The server has gone away”. Instead, this
       intended behavior is available by using a combination of
       “sort()” or “orderBy()” and “limit()”. (Bug #31418813)

     * The nextResult() method returned false against an empty
       result set, and now returns true. Alternatively, use
       hasData() to check if a result set has data. (Bug
       #31037211)

     * The column.getType() method now returns the stringified
       type identifier when before it returned its numeric
       value. For example, DATETIME is now returned instead of
       12. (Bug #30922711)

     * Improved memory management for work performed by 3rd
       party APIs. (Bug #30845472)

     * Added support for lazy decoding of binary column metadata
       content. (Bug #30845366) Dear MySQL users,

MySQL Connector/C++ 8.0.22 is a new release version of the MySQL
Connector/C++ 8.0 series.

Connector/C++ 8.0 can be used to access MySQL implementing Document
Store or in a traditional way, using SQL queries. It allows writing
both C++ and plain C applications using X DevAPI and X DevAPI for C.
It also supports the legacy API of Connector/C++ 1.1 based on JDBC4.

To learn more about how to write applications using X DevAPI, see
“X DevAPI User Guide” at

  https://dev.mysql.com/doc/x-devapi-userguide/en/

See also “X DevAPI Reference” at

  https://dev.mysql.com/doc/dev/connector-cpp/devapi_ref.html

and “X DevAPI for C Reference” at

  https://dev.mysql.com/doc/dev/connector-cpp/xapi_ref.html

For generic information on using Connector/C++ 8.0, see

  https://dev.mysql.com/doc/dev/connector-cpp/

For general documentation about how to get started using MySQL
as a document store, see

  http://dev.mysql.com/doc/refman/8.0/en/document-store.html

To download MySQL Connector/C++ 8.0.22, see the “General Availability (GA)
Releases” tab at

  https://dev.mysql.com/downloads/connector/cpp/

Changes in MySQL Connector/C++ 8.0.22 (2020-10-19, General Availability)

Compilation Notes

     * Connector/C++ now can be compiled using MinGW on Windows.
       Thanks to Eric Beuque for the contribution. Note that
       this enables building on MinGW but does not make MinGW an
       officially supported platform for Connector/C++. (Bug
       #31636723, Bug #100248)

Connection Management Notes

     * For connections made using X Plugin, Connector/C++ now
       enables specifying the compression algorithms to be used
       for connections that use compression. Connection URIs and
       SessionSettings objects permit explicitly specifying the
       preferred algorithms:

          + URI strings permit a compression-algorithms option.
            The value is an algorithm name, or a list of one or
            more comma-separated algorithms specified as an
            array. Examples:
            mysqlx://user:password@host:port/db?compression-algorithms=lz4
            mysqlx://user:password@host:port/db?compression-algorithms=[lz4,zstd_stream]

          + SessionSettings objects permit a
            SessionOption::COMPRESSION_ALGORITHMS option. The
            value is a list of one or more comma-separated
            algorithms. Examples:
            mysqlx::Session sess(SessionOption::USER, “user_name”,
                     SessionOption::PWD, “password”,
                     SessionOption::COMPRESSION_ALGORITHMS, “lz4”);
            mysqlx::Session sess(SessionOption::USER, “user_name”,
                     SessionOption::PWD, “password”,
                     SessionOption::COMPRESSION_ALGORITHMS, “lz4,zstd_stream”);

            Alternatively, the algorithms value can be given as
            a container:
            std::list<std::string> algorithms = {“lz4″,”zstd_stream”};
            mysqlx::Session sess(SessionOption::USER, “user_name”,
                     SessionOption::PWD, “password”,
                     SessionOption::COMPRESSION_ALGORITHMS, algorithms);

          + For X DevAPI for C, there is a new
            MYSQLX_OPT_COMPRESSION_ALGORITHMS option and
            corresponding OPT_COMPRESSION_ALGORITHMS helper
            macro.
            URI mode follows X DevAPI URI mode:
            mysqlx_session_t *sess = mysqlx_get_session_from_url(
            “mysqlx://user:password@host:port/db?compression-algorithms=[lz4,zstd_stream]”, &error);

            Option mode follows the string format used for
            SessionOption:
            mysqlx_session_option_set(opt,
                      OPT_HOST(“host_name”),
                      OPT_USER(“user”),
                      OPT_PWD(“password”),
                      OPT_COMPRESSION_ALGORITHMS(“lz4,zstd_stream”),
                      PARAM_END));

       These rules apply:

          + Permitted algorithm names are zstd_stream,
            lz4_message, and deflate_stream, and their aliases
            zstd, lz4, and deflate. Names are case-insensitive.
            Unknown names are ignored.

          + Compression algorithms options permit multiple
            algorithms, which should be listed in priority
            order. Options that specify multiple algorithms can
            mix full algorithm names and aliases.

          + If no compression algorithms option is specified,
            the default is
            zstd_stream,lz4_message,deflate_stream.

          + The actual algorithm used is the first of those
            listed in the compression algorithms option that is
            also permitted on the server side. However, the
            option for compression algorithms is subject to the
            compression mode:
               o If the compression mode is disabled, the
                 compression algorithms option is ignored.
               o If the compression mode is preferred but no
                 listed algorithm is permitted on the server
                 side, the connection is uncompressed.
               o If the compression mode is required but no
                 listed algorithm is permitted on the server
                 side, an error occurs.
       See also Connection Compression with X Plugin
       (https://dev.mysql.com/doc/refman/8.0/en/x-plugin-connection-compression.html).

Legacy (JDBC API) Notes

     * For applications that use the legacy JDBC API (that is,
       not X DevAPI or X DevAPI for C), Connector/C++ binary
       distributions now include the libraries that provide the
       client-side LDAP authentication plugins, as well as any
       dependent libraries required by the plugins. This enables
       Connector/C++ application programs to connect to MySQL
       servers using simple LDAP authentication, or SASL LDAP
       authentication using the SCRAM-SHA-1 authentication
       method.
       Note
       LDAP authentication requires use of a server from a MySQL
       Enterprise Edition distribution. For more information
       about the LDAP authentication plugins, see LDAP Pluggable
       Authentication
       (https://dev.mysql.com/doc/refman/8.0/en/ldap-pluggable-authentication.html).
       If Connector/C++ was installed from a compressed tar file
       or Zip archive, the application program will need to set
       the OPT_PLUGIN_DIR connection option to the appropriate
       directory so that the bundled plugin library can be
       found. (Alternatively, copy the required plugin library
       to the default directory expected by the client library.)
       Example:
            sql::ConnectOptionsMap connection_properties;

            // To use simple LDAP authentication …

            connection_properties[“userName”] = “simple_ldap_user_name”;
            connection_properties[“password”] = “simple_ldap_password”;
            connection_properties[OPT_ENABLE_CLEARTEXT_PLUGIN]=true;

            // To use SASL LDAP authentication using SCRAM-SHA-1 …

            connection_properties[“userName”] = “sasl_ldap_user_name”;
            connection_properties[“password”] = “sasl_ldap_scram_password”;

            // Needed if Connector/C++ was installed from tar file or Zip archive …

            connection_properties[OPT_PLUGIN_DIR] = “${INSTALL_DIR}/lib{64}/plugin”;

            auto *driver = get_driver_instance();
            auto *con = driver->connect(connection_properties);

            // Execute statements …

            con->close();

     * For applications that use the legacy JDBC API (that is,
       not X DevAPI or X DevAPI for C), LOCAL data loading
       capability for the LOAD DATA statement previously could
       be controlled on the client side only by enabling it for
       all files accessible to the client, or by disabling it
       altogether. The new OPT_LOAD_DATA_LOCAL_DIR option
       enables restricting LOCAL data loading to files located
       in a designated directory. For example, to set the value
       at connect time:
            sql::ConnectOptionsMap opt;
            opt[OPT_HOSTNAME] = “localhost”;
            opt[OPT_LOAD_DATA_LOCAL_DIR] = “/tmp”;

            sql::Connection *conn = driver->connect(opt);

       OPT_LOAD_DATA_LOCAL_DIR can also be set after connect
       time:
            sql::ConnectOptionsMap opt;
            opt[OPT_HOSTNAME] = “localhost”;

            sql::Connection *conn = driver->connect(opt);

            //…. some queries / inserts / updates

            std::string path= “/tmp”;
            conn->setClientOption(OPT_LOAD_DATA_LOCAL_DIR, path);

            // LOAD LOCAL DATA DIR …

            //Disable LOCAL INFILE by setting to null
            conn->setClientOption(OPT_LOAD_DATA_LOCAL_DIR, nullptr);

       The OPT_LOAD_DATA_LOCAL_DIR option maps onto the
       MYSQL_OPT_LOAD_DATA_LOCAL_DIR option for the
       mysql_options() C API function. For more information, see
       Security Considerations for LOAD DATA LOCAL
       (https://dev.mysql.com/doc/refman/8.0/en/load-data-local-security.html).

Bugs Fixed

     * String decoding failed for utf-8 strings that began with
       a xEF byte-order mark. (Bug #31656092)

     * With the CLIENT_MULTI_FLAG option enabled, executing
       multiple statements in a batch caused the next query to
       fail with a Commands out of sync error. (Bug #31399362)

     * For connections made using X Plugin, connections over
       Unix socket files did not work. (Bug #31329938)

     * For connections made using X Plugin, the default
       compression mode was DISABLED rather than PREFERRED. (Bug
       #31173447) Dear MySQL users,

MySQL Connector/Node.js is a new Node.js driver for use with the X
DevAPI. This release, v8.0.22, is a maintenance release of the
MySQL Connector/Node.js 8.0 series.

The X DevAPI enables application developers to write code that combines
the strengths of the relational and document models using a modern,
NoSQL-like syntax that does not assume previous experience writing
traditional SQL.

MySQL Connector/Node.js can be downloaded through npm (see
  https://www.npmjs.com/package/@mysql/xdevapi for details) or from
  https://dev.mysql.com/downloads/connector/nodejs/.

To learn more about how to write applications using the X DevAPI, see
  http://dev.mysql.com/doc/x-devapi-userguide/en/.
For more information about how the X DevAPI is implemented in MySQL
Connector/Node.js, and its usage, see
  http://dev.mysql.com/doc/dev/connector-nodejs/.

Please note that the X DevAPI requires at least MySQL Server version
8.0 or higher with the X Plugin enabled. For general documentation
about how to get started using MySQL as a document store, see
  http://dev.mysql.com/doc/refman/8.0/en/document-store.html.

Changes in MySQL Connector/Node.js 8.0.22 (2020-10-19, General Availability)

Functionality Added or Changed

     * Improved test execution configuration to better align
       with other connectors. For example, unified environment
       variable names (such as changing NODE_TEST_MYSQL_HOST to
       MYSQLX_HOST). See the Connector/Node.js documentation
       (https://dev.mysql.com/doc/dev/connector-nodejs/8.0/) for
       usage information.

Bugs Fixed

     * Non-BIGINT values stored in BIGINT columns were not
       decoded properly in result sets. (Bug #31686805, Bug
       #100324)

     * Fetched results from a SET column would only contain one
       value from the set. (Bug #31654667, Bug #100255)

     * Deprecated the dbPassword and dbUser property names;
       which were aliases to the password and user properties.
       Their usage now emits deprecation level errors. (Bug
       #31599660)

     * Added a SERVER_GONE error handler to avoid potential
       circular dependency warnings with Node.js >= 14.0.0. (Bug
       #31586107, Bug #99869)

     * Restricted the offset() method to the CollectionFind and
       TableSelect APIs, as described in the X DevAPI
       specification. Using offset() on other APIs yielded this
       error: “Error: The server has gone away”. Instead, this
       intended behavior is available by using a combination of
       “sort()” or “orderBy()” and “limit()”. (Bug #31418813)

     * The nextResult() method returned false against an empty
       result set, and now returns true. Alternatively, use
       hasData() to check if a result set has data. (Bug
       #31037211)

     * The column.getType() method now returns the stringified
       type identifier when before it returned its numeric
       value. For example, DATETIME is now returned instead of
       12. (Bug #30922711)

     * Improved memory management for work performed by 3rd
       party APIs. (Bug #30845472)

     * Added support for lazy decoding of binary column metadata
       content. (Bug #30845366)

On Behalf of Oracle/MySQL Release Engineering Team,

Hery Ramilison

MySQL Connector/Node.js 8.0.22 has been released

$
0
0

Feed: Planet MySQL
;
Author: InsideMySQL.com
;

Dear MySQL users,

MySQL Connector/Node.js is a new Node.js driver for use with the X
DevAPI. This release, v8.0.22, is a maintenance release of the
MySQL Connector/Node.js 8.0 series.

The X DevAPI enables application developers to write code that combines
the strengths of the relational and document models using a modern,
NoSQL-like syntax that does not assume previous experience writing
traditional SQL.

MySQL Connector/Node.js can be downloaded through npm (see
  https://www.npmjs.com/package/@mysql/xdevapi for details) or from
  https://dev.mysql.com/downloads/connector/nodejs/.

To learn more about how to write applications using the X DevAPI, see
  http://dev.mysql.com/doc/x-devapi-userguide/en/.
For more information about how the X DevAPI is implemented in MySQL
Connector/Node.js, and its usage, see
  http://dev.mysql.com/doc/dev/connector-nodejs/.

Please note that the X DevAPI requires at least MySQL Server version
8.0 or higher with the X Plugin enabled. For general documentation
about how to get started using MySQL as a document store, see
  http://dev.mysql.com/doc/refman/8.0/en/document-store.html.

Changes in MySQL Connector/Node.js 8.0.22 (2020-10-19, General Availability)

Functionality Added or Changed

     * Improved test execution configuration to better align
       with other connectors. For example, unified environment
       variable names (such as changing NODE_TEST_MYSQL_HOST to
       MYSQLX_HOST). See the Connector/Node.js documentation
       (https://dev.mysql.com/doc/dev/connector-nodejs/8.0/) for
       usage information.

Bugs Fixed

     * Non-BIGINT values stored in BIGINT columns were not
       decoded properly in result sets. (Bug #31686805, Bug
       #100324)

     * Fetched results from a SET column would only contain one
       value from the set. (Bug #31654667, Bug #100255)

     * Deprecated the dbPassword and dbUser property names;
       which were aliases to the password and user properties.
       Their usage now emits deprecation level errors. (Bug
       #31599660)

     * Added a SERVER_GONE error handler to avoid potential
       circular dependency warnings with Node.js >= 14.0.0. (Bug
       #31586107, Bug #99869)

     * Restricted the offset() method to the CollectionFind and
       TableSelect APIs, as described in the X DevAPI
       specification. Using offset() on other APIs yielded this
       error: “Error: The server has gone away”. Instead, this
       intended behavior is available by using a combination of
       “sort()” or “orderBy()” and “limit()”. (Bug #31418813)

     * The nextResult() method returned false against an empty
       result set, and now returns true. Alternatively, use
       hasData() to check if a result set has data. (Bug
       #31037211)

     * The column.getType() method now returns the stringified
       type identifier when before it returned its numeric
       value. For example, DATETIME is now returned instead of
       12. (Bug #30922711)

     * Improved memory management for work performed by 3rd
       party APIs. (Bug #30845472)

     * Added support for lazy decoding of binary column metadata
       content. (Bug #30845366)

On Behalf of Oracle/MySQL Release Engineering Team,

Hery Ramilison

Announcing MySQL Cluster 8.0.22, 7.6.16, 7.5.20, 7.4.30, and 7.3.31

$
0
0

Feed: Planet MySQL
;
Author: Yngve Svendsen
;

We are pleased to announce the release of MySQL Cluster 8.0.22, the latest GA, along with 7.6.16, 7.5.20, 7.4.30, and 7.3.31. MySQL Cluster is the distributed, shared-nothing variant of MySQL. This storage engine provides:

  • In-Memory storage – Real-time performance (with optional checkpointing to disk)
  • Transparent Auto-Sharding – Read & write scalability
  • Active-Active/Multi-Master geographic replication
  • 99.999% High Availability with no single point of failure and on-line maintenance
  • NoSQL and SQL APIs (including C++, Java, http, Memcached and JavaScript/Node.js)

These releases are recommended for use on production systems.

For an overview of what’s new, please see

https://dev.mysql.com/doc/refman/8.0/en/mysql-cluster-what-is-new.html https://dev.mysql.com/doc/refman/5.7/en/mysql-cluster-what-is-new-7-6.html https://dev.mysql.com/doc/refman/5.7/en/mysql-cluster-what-is-new-7-5.html https://dev.mysql.com/doc/refman/5.6/en/mysql-cluster.html (7.4, 7.3)

For information on installing the release on new servers, please see the MySQL Cluster installation documentation at

https://dev.mysql.com/doc/refman/8.0/en/mysql-cluster-installation.html https://dev.mysql.com/doc/refman/5.7/en/mysql-cluster-installation.html (7.6, 7.5) https://dev.mysql.com/doc/refman/5.6/en/mysql-cluster-installation.html (7.4, 7.3)

These cluster releases are available in source and binary form for a number of platforms from our download pages at

https://dev.mysql.com/downloads/cluster/

MySQL Cluster 7.5 – 8.0 is also available from our repository for Linux platforms, go here for details:

http://dev.mysql.com/downloads/

Enterprise binaries for these new releases are available on My Oracle Support:

https://support.oracle.com

Choose the “Patches & Updates” tab, and then choose the “Product or Family (Advanced Search)” side tab in the “Patch Search” portlet.

MySQL Cluster 8.0.22 will also soon be available on the Oracle Software Delivery Cloud:

http://edelivery.oracle.com/

We welcome and appreciate your feedback, bug reports, bug fixes, patches, etc.:

http://bugs.mysql.com/report.php

The following sections list the changes in the release since the previous one. They may also be viewed online at

https://dev.mysql.com/doc/relnotes/mysql-cluster/8.0/en/news-8-0-22.html https://dev.mysql.com/doc/relnotes/mysql-cluster/7.6/en/news-7-6-16.html https://dev.mysql.com/doc/relnotes/mysql-cluster/7.5/en/news-7-5-20.html https://dev.mysql.com/doc/relnotes/mysql-cluster/7.4/en/news-7-4-30.html https://dev.mysql.com/doc/relnotes/mysql-cluster/7.3/en/news-7-3-31.html

Enjoy!

What is a data architect? IT’s data framework visionary

$
0
0

Feed: CIO.
Author: .

Data architect role

Data architects are senior visionaries who translate business requirements into technology requirements and define data standards and principles. The data architect is responsible for visualizing and designing an organization’s enterprise data management framework. This framework describes the processes used to plan, specify, enable, create, acquire, maintain, use, archive, retrieve, control, and purge data. The data architect also “provides a standard common business vocabulary, expresses strategic requirements, outlines high-level integrated designs to meet those requirements, and aligns with enterprise strategy and related business architecture,” according to DAMA International’s Data Management Body of Knowledge.

Data architect responsibilities

According to Panoply, typical data architect responsibilities include:

  • Translating business requirements into technical specifications, including data streams, integrations, transformations, databases, and data warehouses
  • Defining the data architecture framework, standards and principles, including modeling, metadata, security, reference data such as product codes and client categories, and master data such as clients, vendors, materials, and employees
  • Defining reference architecture, which is a pattern that others can follow to create and improve data systems
  • Defining data flows, i.e., which parts of the organization generate data, which require data to function, how data flows are managed, and how data changes in transition
  • Collaborating and coordinating with multiple departments, stakeholders, partners, and external vendors

Data architect vs. data engineer

The data architect and data engineer roles are closely related. In some ways, the data architect is an advanced data engineer. Data architects and data engineers work together to visualize and build the enterprise data management framework. The data architect is responsible for visualizing the “blueprint” of the complete framework that data engineers then build. According to Dataversity, data architects visualize, design, and prepare data in a framework that can be used by data scientists, data engineers, or data analysts. Data engineers assist data architects in building the working framework for data search and retrieval.

How to become a data architect

Data architect is an evolving role and there is no industry-standard certification or training program for data architects. Typically, data architects learn on the job as data engineers, data scientists, or solutions architects and work their way to data architect with years of experience in data design, data management, and data storage work.

What to look for in a data architect

Most data architects hold degrees in information technology, computer science, computer engineering, or related fields. According to Dataversity, good data architects have a solid understanding of the cloud, databases, and the applications and programs used by those databases. They understand data modeling, including conceptualization and database optimization, and demonstrate a commitment to continuing education.

Data architects have the ability to:

  • Design models of data processing that implement the intended business model
  • Develop diagrams representing key data entities and their relationships
  • Generate a list of components needed to build the designed system
  • Communicate clearly, simply, and effectively

Data architect skills

According to Bob Lambert, analytics delivery lead at Anthem and former director of CapTech Consulting, important data architect skills include:

  • A foundation in systems development. Data architects must understand the system development life cycle, project management approaches, and requirements, design, and test techniques, Lambert says.
  • Data modeling and design. This is the core skill of the data architect and the most requested skill in data architect job descriptions, according to Lambert, who notes that this often includes SQL development and database administration.
  • Established and emerging data technologies. Data architects need to understand established data management and reporting technologies, and have some knowledge of columnar and NoSQL databases, predictive analytics, data visualization, and unstructured data.
  • Communication and political savvy. Data architects need people skills. They must be articulate, persuasive, and good salespeople, Lambert says, and they must conceive and portray the big data picture to others.

Data architect certifications

While there are no industry-standard certifications for data architects, there are some certifications that may help data architects in their careers. In addition to certifications in the primary data platforms used by their organization, the following certifications are popular:

Data architect salary

According to data from Robert Half’s 2020 Technology and IT Salary Guide, the average salary for data architects in the US, based on experience, breaks down as follows:

  • 25th percentile: $119,750
  • 50th percentile: $141,250
  • 75th percentile: $163,500
  • 95th percentile: $193,500

According to compensation analysis from PayScale, the median data architect salary is $118,458 per year, with total pay, including bonuses and profit share, ranging from $78,000 to $173,000 annually.

Data architect jobs

A recent search for data architect jobs on Indeed.com showed positions available in a range of industries, including financial services, consulting, healthcare, pharmaceuticals, technology and higher education.

A sampling of data architect job descriptions shows key areas of responsibility such as: creating a dataops and BI transformation roadmap, developing and sustaining a data strategy, implementing and optimizing physical database design, and designing and implementing data migration and integration processes.

Companies are looking for bachelor’s degrees in computer science, information science, engineering, or equivalent fields, though master’s degrees are preferred. Most are looking for 8 to 15 years of experience in a related role. They want highly motivated, experienced innovators with excellent interpersonal skills, strong collaboration, and the ability to communicate effectively verbally and in writing.

Next read this:

Architecting a Data Lake for Higher Education Student Analytics

$
0
0

Feed: AWS Architecture Blog.

One of the keys to identifying timely and impactful actions is having enough raw material to work with. However, this up-to-date information typically lives in the databases that sit behind several different applications. One of the first steps to finding data-driven insights is gathering that information into a single store that an analyst can use without interfering with those applications.

For years, reporting environments have relied on a data warehouse stored in a single, separate relational database management system (RDBMS). But now, due to the growing use of Software as a service (SaaS) applications and NoSQL database options, data may be stored outside the data center and in formats other than tables of rows and columns. It’s increasingly difficult to access the data these applications maintain, and a data warehouse may not be flexible enough to house the gathered information.

For these reasons, reporting teams are building data lakes, and those responsible for using data analytics at universities and colleges are no different. However, it can be challenging to know exactly how to start building this expanded data repository so it can be ready to use quickly and still expandable as future requirements are uncovered. Helping higher education institutions address these challenges is the topic of this post.

About Maryville University

Maryville University is a nationally recognized private institution located in St. Louis, Missouri, and was recently named the second fastest growing private university by The Chronicle of Higher Education. Even with its enrollment growth, the university is committed to a highly personalized education for each student, which requires reliable data that is readily available to multiple departments. University leaders want to offer the right help at the right time to students who may be having difficulty completing the first semester of their course of study. To get started, the data experts in the Office of Strategic Information and members of the IT Department needed to create a data environment to identify students needing assistance.

Critical data sources

Like most universities, Maryville’s student-related data centers around two significant sources: the student information system (SIS), which houses student profiles, course completion, and financial aid information; and the learning management system (LMS) in which students review course materials, complete assignments, and engage in online discussions with faculty and fellow students.

The first of these, the SIS, stores its data in an on-premises relational database, and for several years, a significant subset of its contents had been incorporated into the university’s data warehouse. The LMS, however, contains data that the team had not tried to bring into their data warehouse. Moreover, that data is managed by a SaaS application from Instructure, called “Canvas,” and is not directly accessible for traditional extract, transform, and load (ETL) processing. The team recognized they needed a new approach and began down the path of creating a data lake in AWS to support their analysis goals.

Getting started on the data lake

The first step the team took in building their data lake made use of an open source solution that Harvard’s IT department developed. The solution, comprised of AWS Lambda functions and Amazon Simple Storage Service (S3) buckets, is deployed using AWS CloudFormation. It enables any university that uses Canvas for their LMS to implement a solution that moves LMS data into an S3 data lake on a daily basis. The following diagram illustrates this portion of Maryville’s data lake architecture:

The data lake for the Learning Management System data

Diagram 1: The data lake for the Learning Management System data

The AWS Lambda functions invoke the LMS REST API on a daily schedule resulting in Maryville’s data, which has been previously unloaded and compressed by Canvas, to be securely stored into S3 objects. AWS Glue tables are defined to provide access to these S3 objects. Amazon Simple Notification Service (SNS) informs stakeholders the status of the data loads.

Expanding the data lake

The next step was deciding how to copy the SIS data into S3. The team decided to use the AWS Database Migration Service (DMS) to create daily snapshots of more than 2,500 tables from this database. DMS uses a source endpoint for secure access to the on-premises database instance over VPN. A target endpoint determines the specific S3 bucket into which the data should be written. A migration task defines which tables to copy from the source database along with other migration options. Finally, a replication instance, a fully managed virtual machine, runs the migration task to copy the data. With this configuration in place, the data lake architecture for SIS data looks like this:

Diagram 2: Migrating data from the Student Information System

Diagram 2: Migrating data from the Student Information System

Handling sensitive data

In building a data lake you have several options for handling sensitive data including:

  • Leaving it behind in the source system and avoid copying it through the data replication process
  • Copying it into the data lake, but taking precautions to ensure that access to it is limited to authorized staff
  • Copying it into the data lake, but applying processes to eliminate, mask, or otherwise obfuscate the data before it is made accessible to analysts and data scientists

The Maryville team decided to take the first of these approaches. Building the data lake gave them a natural opportunity to assess where this data was stored in the source system and then make changes to the source database itself to limit the number of highly sensitive data fields.

Validating the data lake

With these steps completed, the team turned to the final task, which was to validate the data lake. For this process they chose to make use of Amazon Athena, AWS Glue, and Amazon Redshift. AWS Glue provided multiple capabilities including metadata extraction, ETL, and data orchestration. Metadata extraction, completed by Glue crawlers, quickly converted the information that DMS wrote to S3 into metadata defined in the Glue data catalog. This enabled the data in S3 to be accessed using standard SQL statements interactively in Athena. Without the added cost and complexity of a database, Maryville’s data analyst was able to confirm that the data loads were completing successfully. He was also able to resolve specific issues encountered on particular tables. The SQL queries, written in Athena, could later be converted to ETL jobs in AWS Glue, where they could be triggered on a schedule to create additional data in S3. Athena and Glue enabled the ETL that was needed to transform the raw data delivered to S3 into prepared datasets necessary for existing dashboards.

Once curated datasets were created and stored in S3, the data was loaded into an AWS Redshift data warehouse, which supported direct access by tools outside of AWS using ODBC/JDBC drivers. This capability enabled Maryville’s team to further validate the data by attaching the data in Redshift to existing dashboards that were running in Maryville’s own data center. Redshift’s stored procedure language allowed the team to port some key ETL logic so that the engineering of these datasets could follow a process similar to approaches used in Maryville’s on-premises data warehouse environment.

Conclusion

The overall data lake/data warehouse architecture that the Maryville team constructed currently looks like this:

The complete architecture

Diagram 3: The complete architecture

Through this approach, Maryville’s two-person team has moved key data into position for use in a variety of workloads. The data in S3 is now readily accessible for ad hoc interactive SQL workloads in Athena, ETL jobs in Glue, and ultimately for machine learning workloads running in EC2, Lambda or Amazon Sagemaker. In addition, the S3 storage layer is easy to expand without interrupting prior workloads. At the time of this writing, the Maryville team is both beginning to use this environment for machine learning models described earlier as well as adding other data sources into the S3 layer.

Acknowledgements

The solution described in this post resulted from the collaborative effort of Christine McQuie, Data Engineer, and Josh Tepen, Cloud Engineer, at Maryville University, with guidance from Travis Berkley and Craig Jordan, AWS Solutions Architects.

Horizontal Sharding for MySQL Made Easy

$
0
0

Feed: Planet MySQL
;
Author: PlanetScale
;

For developers building out a web application, a transactional datastore is the obvious and proven choice, but with success comes scale limitations. A monolithic database works well initially, but as an application sees growth, the size of its data will eventually grow beyond what is optimal for a single server. If the application can live with eventually consistent data, scaling read traffic can be solved with relative ease by adding more replicas. However, scaling write traffic is more challenging; for example at a certain point even the largest MySQL database will see performance issues. 

This is not a new challenge, organizations have faced it for years, and one of the key patterns for solving it is horizontal sharding. Horizontal sharding refers to taking a single MySQL database and partitioning the data across several database servers each with identical schema. This spreads the workload of a given database across multiple database servers, which means you can scale linearly simply by adding more database servers as needed. Each of these servers is called a “shard”. Having multiple shards reduces the read and write traffic handled by a single database server and makes it possible to keep the data on a single database server at an optimal size. However, now, since you are dealing with multiple servers rather than one this adds additional complexity  to query routing and to the operational tasks like backup and restore, schema migration, and monitoring.

Many companies implemented horizontal sharding at the application level. In this approach, all of the logic for routing queries to the correct database server lives in the application. This requires additional logic at the application level, which must be updated any time a new feature is added. It also means that cross shard features need to be implemented in the application. Additionally, as data grows and the initial set of shards runs out of capacity, “resharding” or increasing the number of shards while continuing to serve traffic becomes a daunting operational challenge.  

Pinterest took this approach after trying out the available NoSQL technology and determining that it was not mature enough at that time. Marty Weiner, a software engineer who worked on the project, noted, “We had several NoSQL technologies, all of which eventually broke catastrophically.” Pinterest mapped their data by primary key, and used that key to map data to the shard where it resided. Sharding in this way provided scale, but traded off cross shard joins and the use of foreign keys. Similarly, Etsy took this approach when moving to a sharded database system, but added a two-way lookup primary key to the shard_id and packed shards onto hosts, automating some of the work of managing shards. In both cases, however, ongoing management of shards, including splitting shards after the initial resharding, presented significant challenges. 

Alongside sharding at the application layer, another approach to horizontal sharding emerged. Engineers at YouTube began building out the open source project Vitess in 2010. Vitess sits between the application and MySQL databases, allowing horizontally sharded databases to appear monolithic to the application. In addition to removing the complexity of query routing from the application, Vitess provides master failover and backup solutions that remove the operational complexity of a sharded system, as well as features like connection pooling and query rewriting for improved performance. 

Companies like Square (read about their journey), Slack, JD.com, and many more have used Vitess to scale their MySQL databases. JD.com, one of the largest online retailers in China, saw 35 million QPS run through Vitess during a peak in traffic on Singles day. Slack has migrated almost all of their databases to Vitess, surviving the massive influx of traffic from the transition to work from home earlier this year. Both Etsy and Pinterst have moved some of their workloads to Vitess because of the management benefits Vitess provides. Vitess has demonstrated its ability to run in production against high workloads repeatedly. 

However, running Vitess at scale still requires an engineering team and not all organizations have the depth that Slack and Square do. At PlanetScale, we’ve built a database-as-a-service on top of Vitess so that anyone can access this level of scale with their MySQL databases. With PlanetScaleDB, you can start small with a single MySQL instance and scale up as you grow. When the time comes to horizontally shard, you’ll need to design a sharding scheme, but once you have decided how to organize your data across shards, you’ll be able to shard your database via our UI without having to make significant changes to your application. In just a few clicks, and the time it takes to copy your data, you can move from a single database server to a sharded database with as many shards as you need. 

Check out this video demo to watch a database grow from one shard to 128 shards seamlessly, while serving traffic. 

This feature is currently in beta and you can give it a try here

Data Con LA 2020 and New Introductory Video Series on MySQL

$
0
0

Feed: Planet MySQL
;
Author: Dave Stokes
;

 Data Con LA starts October 23rd and I will be speaking on Sunday and I will be speaking on Sunday the 25th on MySQL’s NoSQL JSON Store in a talk titled MySQL Without the SQL — Oh My!

The talk is pre-recorded but I will be live for the question and answer segment. So this is your chance to ask me your question.

Dave’s MySQL Basics is a new video based series I am starting to teach the basics of MySQL.  I have been talking with book publishers, hiring managers, DBAs of all levels, and many others.  They have all said they would like to see a simple, modular way to learn MySQL.  So rather than take a few years to produce a book, I am creating a series of videos that will be short (the goal is five minutes or less), not too pedantic (still have to teach the very low level basics), and that can be updated quickly when/if the material changes.  The videos will be on Youtube and course materials I create will be at https://github.com/davidmstokes/MySQLBasics, where you can also find the video links.


GRANDstack: Graphs All the Way Down

$
0
0

Feed: Neo4j Graph Database Platform.
Author: Allison Wu.
Editor’s Note: This presentation was given by Will Lyon at NODES 2019 in October 2019.

Presentation Summary

GRANDstack is a full-stack framework for building applications with GraphQL, React, Apollo and the Neo4j Database. In this post, Neo4j Developer Relations Engineer Will Lyon will discuss why GraphQL specifically has been quickly gaining adoption. He’ll delve into why representing data as a graph is a win when building your API – for both API developers and consumers – and especially if you’re working with graph data in the data layer, such as with a graph database like Neo4j.

Moreover, he’ll cover some of the advantages of GraphQL over REST, as well as challenges with adopting GraphQL. He also dives into backend considerations for GraphQL and shows how to leverage the power of representing your API data as a graph, using GraphQL and graph databases on the backend.

In short, following this post, you’ll understand why GRANDstack is becoming increasingly efficient and effective by employing graphs all the way down.

Full Presentation: GRANDstack: Graphs All the Way Down

My name’s Will, and I work on the Neo4j Labs Team at Neo4j. My specific team doesn’t work on the core database in Neo4j Labs, but rather on tools, extensions and other features around the database, GRANDstack and GraphQL integration being two of our projects.

In this post, I’ll provide an overview of what GRANDstack is. Then, we’ll jump into building a NODES 2019 conference recommendations app.

What is GRANDstack?

GRANDstack is a full-stack framework for building applications. The individual components of GRANDstack are GraphQL, React, Apollo and the Neo4j database. GraphQL is our API layer, and React is a JavaScript UI library for creating user interfaces on web, mobile and now in VR. Apollo is a suite of tools that makes it easier to use GraphQL both on the client and the server. Lastly, the Neo4j database is a native graph database.

You might not be too familiar with GraphQL, which is an API query language. With GraphQL, we have a type system, we describe the data that’s available in our API, the client asks for only the relevant data for that request and the data comes back in the same shape as the query. In this way, we get exactly what the client asked for – nothing more. This is, essentially, efficient data fetching.

GraphQL makes an important observation: That your application data is a graph. Regardless of how you’re storing it on the backend – whether it be in a document database, a relational database or a graph database – it’s still presented as a graph. This is interesting and exciting for the Neo4j and graph database community, because it means there’s one-to-one mapping between the data model presented in the API layer to the database all the way in the backend.

The goal of our GRANDstack and GraphQL Neo4j integrations is to make it easy to expose a GraphQL API from Neo4j. We do this by allowing GraphQL type definitions to drive the database data model, auto-generating a GraphQL CRUD API from those type definitions and conducting an auto-generation of resolvers (the boilerplate data-fetching code our integration takes care of so you don’t have to manually write it).

This also works the other way around. If you have an existing Neo4j database, we can infer a GraphQL schema from that existing database and provide a full CRUD GraphQL API on top of Neo4j by hardly writing any code. This is what the heart of GRANDstack and GraphQL Neo4j is all about.

Note: In general, if you’re looking for resources on how to get started with GRANDstack, grandstack.io is the place to go, with documentation, tutorial videos, starter projects and a GRANDstack blog.

NODES Session Recommender Web Application

Earlier, as I was getting ready for the NODES conference, I realized we needed a NODES session recommender web application, and I thought it’d be fun to put this together.

What I wanted to do was make it easy to not only show you what sessions are available, but also make it easy to search for sessions you might be interested in.

But, one particular thing a graph database does really well is the idea of personalized recommendations. For example, what are similar conference talks that someone might enjoy, either based on content or user interaction?

This app can be found on nodes2019-app.grandstack.io. We’ll talk about the details later on this post.

Evolution of Web Development

As I was writing this post, I reflected back on the evolution of web development.

In the mid-90s, I was the assistant webmaster at Naples Elementary School. There, I maintained what would be the equivalent of a blog and wrote static HTML pages about field trips that we went on to cheese factories and places like that. This was my first exposure to the web; everything was still new at that point.

During this time, we had this idea of CGI, where we had directories, in which executable scripts would run on the server, fetch data from a database and give you dynamic content. This way, I could now embed database queries in template language along with my static HTML and whatnot.

All of this became, essentially, the LAMP stack, with Linux, Apache, MySQL and PHP. This was initially very popular because it became easy to fetch data from a database dynamically and render simple views.

Later on, we realized that embedding database queries in templating languages was ugly and hard to maintain, and we needed a better representation of this – an intermediate layer. This is when REST APIs and JSON became popular. jQuery became a way to fetch data from a REST API and render that on the front-end. Actually, the first job in which I was paid to do web development was using jQuery.

From there, we saw the need for web-scale databases, so we saw NoSQL and the MEAN stack emerge, including Mango, Express, Angular and Node.js. This made it easy to map documents in a document database to REST APIs. We also started to see front-end frameworks like Angular that made it easier for us to encapsulate logic and UI, and Meteor, which pushed the edge of what was possible with web development, giving us near real-time streaming content.

That brings us to the present day. On the front-end, we have React, which was open-sourced in 2013 by Facebook. Here, we realized the goal of moving from event listeners to declarative actions about the state.

Concepts like virtual DOM also allow for performance improvements. Instead of rendering our entire view, we now just need to render the minimum amount needed based on the change in state. Not only does this provide components to encapsulate logic and UI, but it also gives us performance optimizations.

Shortly after that, GraphQL was also open-sourced by Facebook. Again, this is all about efficient data fetching and providing a type system for our data, allowing us to describe and query our API as a graph.

At about the same time, we saw the rise of graph databases like Neo4j. As the move from other forms of NoSQL became problematic and data became more complex, the intuitive graph data model with graph databases was more appealing for developers. We started to see very different performance characteristics with graph databases, which were optimized for traversing a graph efficiently.

Combine all of this with some of the serverless and deployment options we have today. I’m thinking of things like ZEIT Now and Netlify, both of which make it easy to deploy front-end and backend code together with a simple command-line tool.

Ultimately, looking back at the evolution of web development, we’re very fortunate to be where we are now and have these technologies to work with.

And as I said earlier, an interesting observation here is if we look at the technologies that have been emerging, there’s a lot of graphiness going on. With GraphQL, we’re talking about exposing our API as a graph. In a graph database, we’re talking about actually storing data in our database using this graph data model.

This is why I’m so excited for GRANDstack: We’re working with graphs all the way down and leveraging performance optimizations and intuitiveness throughout the stack.

NODES Conference Graph

So how do we actually build this aforementioned conference app?

This is a great way to get our hands on actual graph data. Oftentimes, instead of looking at a tabular representation of the schedule for the day, it’s a lot nicer to look at a graph representation.

So this is the data model we’re using for this conference app. It provides a little view of Cypher and how to query it.

NODES Schedule GraphQL API

The next step for building this conference app is building our GraphQL API, because our front-end is going to query it.

What is GraphQL?

Before we go too deep into how to build the GraphQL API, I want to go a bit more into GraphQL. Let’s imagine that we have some data about movies, genres and actors. The first thing we do is define type definitions using the Schema Definition Language for GraphQL.

Once we’ve deployed and spun up our GraphQL API, we can use this powerful feature in GraphQL called introspection, which means that our GraphQL service is able to be queried. From here, the schema then becomes our API specification and documentation, and we can use tools like GraphiQL and GraphQL Playground to explore it, essentially making this a self-documenting, self-exploring API.

Below is a GraphQL query. The GraphQL query has a few components, one is the operation name and arguments. Here, we’re saying find movies with the title “A River Runs Through It.”

The bottom part of this query is the selection set, which specifies how we wanna traverse through that graph and what fields we want to return.

Note that our nested selections can also have arguments. Here, we’re only giving me the first two actors connected to “A River Runs Through It.” But, we’re traversing a couple hops down, so we go from “A River Runs Through It” to its directors, then from those directors to all the movies connected to those directors and lastly the title.

What we’re describing is a graph traversal. This is the data that comes back: We get our movie, it runs through the actors, the directors and all the movies connected to the directors, which in this case is just Robert Redford:

It’s important to understand that GraphQL is an API query language, not a database query language. In this case, we have limited expressivity, and don’t have the ability to do projections and aggregations. It’s also important to point out that GraphQL exposes your application data as a graph, but it’s not just for graph databases; we’re able to use essentially any data layer with GraphQL.

GraphQL Advantages

Some advantages of GraphQL include efficient data fetching, as we talked about earlier. This means we’re not going to be overfetching, which entails requesting more data from the backends than what we need and sending that over the wire. With GraphQL, we only get back the piece of the user object we’re interested in. If we’re only rendering a few fields in our view, that’s all we should fetch from the backend because it might be expensive to fetch some of those fields and it’s also less data sent over the wire.

Underfetching is another problem GraphQL solves. This is the idea of sending all the data needed to render a view in a single request. With REST, if I fetch a list of things – maybe a list of blog posts, for example – and I need the author for each one, I might have to make another request for each author to obtain more information. However, with GraphQL, we can get all the posts and author information in one request.

There’s also the concept of graphs all the way down, from the front-end framework to the API. This basically allows us to have more component-based data interactions. When we’re interacting with our API, we’re typically doing this in the context of relationships – not resources.

GraphQL Challenges

These advantages don’t come for free, of course. There’s always trade-offs.

One of the challenges of GraphQL is that well-understood practices from REST don’t really apply here, such as HTTP status codes, errors and caching. There are ways to handle them in GraphQL and the GraphQL community has really pushed forward a lot of this, but they might not be the ways you’re used to, especially when you first come from a REST world.

There’s also the challenge of having a client request arbitrarily complex queries and not having the performance considerations to control them. However, there’s also a solution to this: We can essentially restrict and define the queries or depth of a query that a client is able to request.

Then we have considerations like rate limiting and query costing, because the request that comes in might not necessarily be just requesting one resource. But again, there are solutions to these challenges.

Building a GraphQL Service

So how do we build a GraphQL service? Essentially, the high-level approach here is to take our type definitions and implement resolvers, which are the functions that define how to fetch data for a GraphQL request.

In standard cases, we might have to do authorization validation, query a database, validate and format that response and then send some data back. We might end up writing a lot of boilerplate in our resolvers, which is not so much fun.

The problems with what I’ll call the standard approach – where we write type definitions and implement resolvers with data-fetching code – is we end up with schema duplication, in which both our API and our database are maintaining a schema.

Also, we often have a mapping and translation layer from GraphQL to whatever our backend layer is, whether it’s another API, a document database or a relational database. There’s a lot of boilerplate when we write this.

Now if we look back at the image above, we’re getting a session from a database driver instance, executing a query, iterating through the results and reformatting that – definitely not ideal.

Then, we also have this n+1 query problem. We may have the same problem from the backend, where we have to fetch a list of things and then iterate back to the database after seeing that we’ve requested a connected field. Instead, we want to make as few requests to the database as possible.

GraphQL “Engines”

A class of tools called GraphQL engines has come out to address some of these issues. These are tools that auto-generate GraphQL schema and generate database queries from GraphQL requests.

Below are some examples. A lot of these are built on top of Postgres or, in the case of AWS AppSync, exposing AWS resources with GraphQL.

Neo4j GraphQL

Here I want to focus on Neo4j-GraphQL integrations.

The goals of these integrations are to take a GraphQL first development approach, where we’re generating Cypher from GraphQL, using the GraphQL schema to drive the database model and taking care of that boilerplate code. Then, we want to extend the functionality of GraphQL.

As we said, GraphQL is used for querying an API – not a database – so we’ll need to expose more custom logic to handle cases that are beyond simply CRUD.

GraphQL First Development

First up: GraphQL first development. When we talk about this, what we mean is that the GraphQL schema becomes the driver of our API – of how we implement front-end data-fetching code, the data model and data-fetching code for the database.

Because there is very close mapping from the GraphQL type definitions to the property graph model in Neo4j, this is relatively easy to do with a graph database.

Auto-Generating GraphQL CRUD API

Next, we take those type definitions and auto-generate a GraphQL CRUD API. We haven’t talked about this in too much detail, but basically, we generate query invitation types. These are the entry points for the API for both reads and write operations.

Then, we add a bunch of things for convenience, such as ordering, pagination, filtering and working with the DateTime database types.

Generating Cypher from GraphQL

An important piece of this integration is taking GraphQL, translating it to Cypher and optimizing that generated Cypher query for one single roundtrip to the database. Doing this solves the n+1 query problem.

Extending GraphQL with Cypher

The next piece is extending the functionality of GraphQL with Cypher. To do that, we’ve added the following Cypher GraphQL schema directive:

What this does is it allows us to bind a Cypher query to a field in our GraphQL schema. In turn, this becomes a computed field, so that an attached Cypher query runs as a subquery in the overall generated Cypher query, and it’s still just one trip to the database. (If you’re not familiar with schema directives in GraphQL, they’re essentially GraphQL’s built-in extension mechanism to define custom server-side behavior.)

There are a few versions of our GraphQL integration. One’s a database plugin that’s useful for local development and testing, but the one I want to discuss today is neo4j-graphql.js, which is published as a Node.js package and used with other JavaScript GraphQL tooling such as Apollo Server GraphQL.js.

An important point here is that we’re just talking about making it easy to build an API application that sits between the client and the database. We’re not sending GraphQL directly to the database; we’re still building this API layer, but rather we’re just doing it in a way that makes it useful and easier to create GraphQL APIs.

Generating Database Queries from GraphQL Requests

Earlier, I discussed how GraphQL engines are declarative database integrations for GraphQL that allow us to either infer or derive a database from GraphQL type definitions. This gives us this auto-generated GraphQL API on top of our database and auto-generates data fetching code, which is really convenient.

You might be curious about how these GraphQL engines work under the hood. Before, when we talked about our GraphQL resolvers, we implemented the resolver, defined some data-fetching code and maybe did some authorization validation.

Now, the resolver is instead passed into arguments, one of which is the ResolveInfo argument. Inside this ResolveInfo argument, we have things like the GraphQL query abstract syntax tree (AST) as well as a representation of the GraphQL schema. In this way, we can find the selection set in a nested fashion and see what variables are passed in.

Essentially, what we do here is traverse that AST to find the nested selection set, which looks at all of the fields that are requested. We use this to generate one single database query.

You don’t need to understand how all this works to use our GraphQL integrations, but if you’re curious, I gave a talk at the GraphQL Summit in San Francisco, which was a more advanced session on how we’ve built this GraphQL integration and how to leverage this ResolveInfo object to generate more efficient data-fetching code in GraphQL.

Who’s Using GRANDstack & Neo4j GraphQL?

What I want to do next is talk a little bit about some of the folks who are using GRANDstack and Neo4j GraphQL, and then point you to some resources.

First, I want to talk about how we use GRANDstack and Neo4j internally. Well, if you’ve ever gone to the community site, you’ve probably seen numerous activity feeds at the top of the page.

Every week, we have This Week in Neo4j, where we feature a community member. We also have links to other resources and popular community content, which includes community projects that people are working on.

The way that we fetch all of this is from a Neo4j database. We call it Community Graph, which has information about the community, what they’re working on, GitHub projects and who’s organizing meetups about Neo4j and graph databases. These are all populated by lambdas that periodically fetch data from various APIs.

There’s also a GraphQL API that sits on top of that. Whenever you go to the community site, it sends a GraphQL request to populate the top of that page and fetches data from Neo4j.

The next group I want to talk about is the Financial Times, who’s a financial publication that also uses GRANDstack and Neo4j GraphQL. They employ Neo4j in a few different ways, but the specific project I’ll talk about is known as the bizops API. They wrote a great blog post that mostly talks about performance testing when adopting this Neo4j-GraphQL integration.

Essentially, the data model they have here is one that connects things like products to internal teams to the stakeholders for those teams. When something’s down, they know what products will be impacted, which teams support those teams and who to call in the middle of the night.

This is really neat because it shows how you can use GraphQL and GRANDstack to not only build applications you’re exposing externally, but also to build internal tools.

Rhys Evans from the Financial Times, who’s a principal engineer that works on this project, gave a great talk, where he shows how they put this system together. He compares using GRANDstack to being Mark Zuckerberg and hacking something together very productively, which I thought was an interesting comparison. What we’re really talking about is developer productivity. As we look back to the popularity of LAMP stack and MEAN stack, it was because they made it easy for developers to start building applications. I hope GRANDstack will be like that as well.

The third GRANDstack and Neo4j-GraphQL user I want to talk about is Human Connection, who’s building a decentralized social network in an effort to bring about positive local and global changes. Specifically, they use Neo4j GraphQL and GRANDstack to power their network. They held an online meetup a few months ago, where they talked about some of the internal workings of the project.

Ultimately, I really appreciate working with the GraphQL community and seeing the interest around this. Everyone who’s involved with GraphQL sees its advantages and the benefits.

This is why Neo4j joined the GraphQL Foundation as a founding member earlier this year. The GraphQL Foundation essentially comprises the stewards of GraphQL after it was open-sourced by Facebook, who then handed it over to this foundation to nurture and evolve GraphQL for the community. At Neo4j, we believe GraphQL is really important, and we’re happy to support it by being a member of the GraphQL Foundation.

AWS serverless data analytics pipeline reference architecture

$
0
0

Feed: AWS Big Data Blog.

Onboarding new data or building new analytics pipelines in traditional analytics architectures typically requires extensive coordination across business, data engineering, and data science and analytics teams to first negotiate requirements, schema, infrastructure capacity needs, and workload management.

For a large number of use cases today however, business users, data scientists, and analysts are demanding easy, frictionless, self-service options to build end-to-end data pipelines because it’s hard and inefficient to predefine constantly changing schemas and spend time negotiating capacity slots on shared infrastructure. The exploratory nature of machine learning (ML) and many analytics tasks means you need to rapidly ingest new datasets and clean, normalize, and feature engineer them without worrying about operational overhead when you have to think about the infrastructure that runs data pipelines.

A serverless data lake architecture enables agile and self-service data onboarding and analytics for all data consumer roles across a company. By using AWS serverless technologies as building blocks, you can rapidly and interactively build data lakes and data processing pipelines to ingest, store, transform, and analyze petabytes of structured and unstructured data from batch and streaming sources, all without needing to manage any storage or compute infrastructure.

In this post, we first discuss a layered, component-oriented logical architecture of modern analytics platforms and then present a reference architecture for building a serverless data platform that includes a data lake, data processing pipelines, and a consumption layer that enables several ways to analyze the data in the data lake without moving it (including business intelligence (BI) dashboarding, exploratory interactive SQL, big data processing, predictive analytics, and ML).

Logical architecture of modern data lake centric analytics platforms

The following diagram illustrates the architecture of a data lake centric analytics platform.

You can envision a data lake centric analytics architecture as a stack of six logical layers, where each layer is composed of multiple components. A layered, component-oriented architecture promotes separation of concerns, decoupling of tasks, and flexibility. These in turn provide the agility needed to quickly integrate new data sources, support new analytics methods, and add tools required to keep up with the accelerating pace of changes in the analytics landscape. In the following sections, we look at the key responsibilities, capabilities, and integrations of each logical layer.

Ingestion layer

The ingestion layer is responsible for bringing data into the data lake. It provides the ability to connect to internal and external data sources over a variety of protocols. It can ingest batch and streaming data into the storage layer. The ingestion layer is also responsible for delivering ingested data to a diverse set of targets in the data storage layer (including the object store, databases, and warehouses).

Storage layer

The storage layer is responsible for providing durable, scalable, secure, and cost-effective components to store vast quantities of data. It supports storing unstructured data and datasets of a variety of structures and formats. It supports storing source data as-is without first needing to structure it to conform to a target schema or format. Components from all other layers provide easy and native integration with the storage layer. To store data based on its consumption readiness for different personas across organization, the storage layer is organized into the following zones:

  • Landing zone – The storage area where components from the ingestion layer land data. This is a transient area where data is ingested from sources as-is. Typically, data engineering personas interact with the data stored in this zone.
  • Raw zone – After the preliminary quality checks, the data from the landing zone is moved to the raw zone for permanent storage. Here, data is stored in its original format. Having all data from all sources permanently stored in the raw zone provides the ability to “replay” downstream data processing in case of errors or data loss in downstream storage zones. Typically, data engineering and data science personas interact with the data stored in this zone.
  • Curated zone – This zone hosts data that is in the most consumption-ready state and conforms to organizational standards and data models. Datasets in the curated zone are typically partitioned, cataloged, and stored in formats that support performant and cost-effective access by the consumption layer. The processing layer creates datasets in the curated zone after cleaning, normalizing, standardizing, and enriching data from the raw zone. All personas across organizations use the data stored in this zone to drive business decisions.

Cataloging and search layer

The cataloging and search layer is responsible for storing business and technical metadata about datasets hosted in the storage layer. It provides the ability to track schema and the granular partitioning of dataset information in the lake. It also supports mechanisms to track versions to keep track of changes to the metadata. As the number of datasets in the data lake grows, this layer makes datasets in the data lake discoverable by providing search capabilities.

Processing layer

The processing layer is responsible for transforming data into a consumable state through data validation, cleanup, normalization, transformation, and enrichment. It’s responsible for advancing the consumption readiness of datasets along the landing, raw, and curated zones and registering metadata for the raw and transformed data into the cataloging layer. The processing layer is composed of purpose-built data-processing components to match the right dataset characteristic and processing task at hand. The processing layer can handle large data volumes and support schema-on-read, partitioned data, and diverse data formats. The processing layer also provides the ability to build and orchestrate multi-step data processing pipelines that use purpose-built components for each step.

Consumption layer

The consumption layer is responsible for providing scalable and performant tools to gain insights from the vast amount of data in the data lake. It democratizes analytics across all personas across the organization through several purpose-built analytics tools that support analysis methods, including SQL, batch analytics, BI dashboards, reporting, and ML. The consumption layer natively integrates with the data lake’s storage, cataloging, and security layers. Components in the consumption layer support schema-on-read, a variety of data structures and formats, and use data partitioning for cost and performance optimization.

Security and governance layer

The security and governance layer is responsible for protecting the data in the storage layer and processing resources in all other layers. It provides mechanisms for access control, encryption, network protection, usage monitoring, and auditing. The security layer also monitors activities of all components in other layers and generates a detailed audit trail. Components of all other layers provide native integration with the security and governance layer.

Serverless data lake centric analytics architecture

To compose the layers described in our logical architecture, we introduce a reference architecture that uses AWS serverless and managed services. In this approach, AWS services take over the heavy lifting of the following:

  • Providing and managing scalable, resilient, secure, and cost-effective infrastructural components
  • Ensuring infrastructural components natively integrate with each other

This reference architecture allows you to focus more time on rapidly building data and analytics pipelines. It significantly accelerates new data onboarding and driving insights from your data. The AWS serverless and managed components enable self-service across all data consumer roles by providing the following key benefits:

  • Easy configuration-driven use
  • Freedom from infrastructure management
  • Pay-per-use pricing model

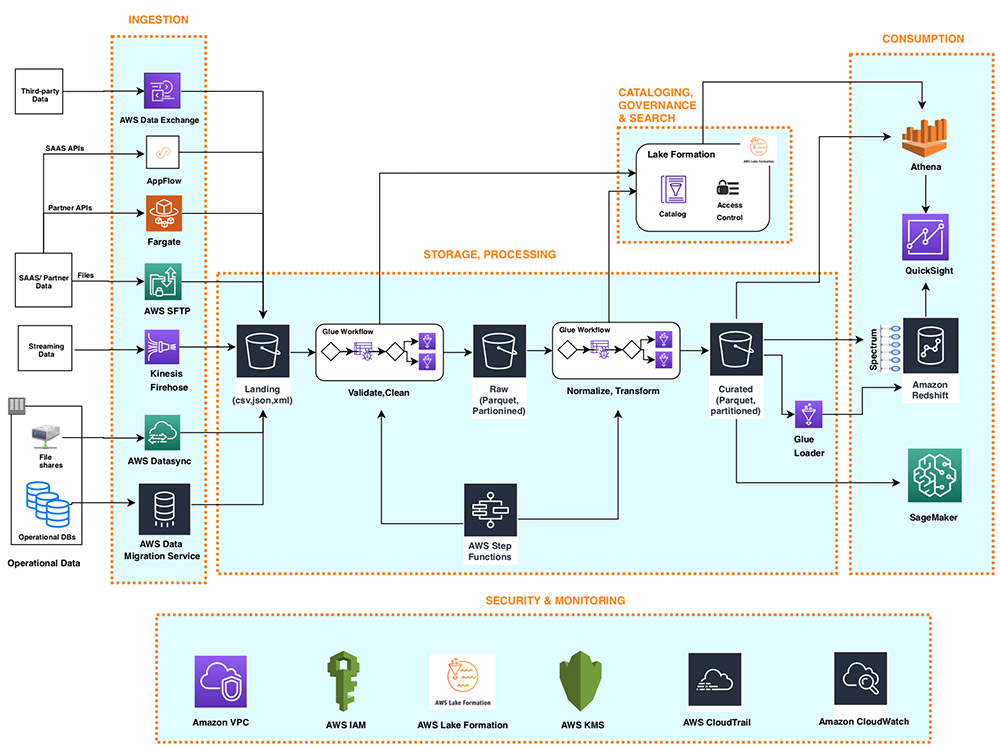
The following diagram illustrates this architecture.

Ingestion layer

The ingestion layer in our serverless architecture is composed of a set of purpose-built AWS services to enable data ingestion from a variety of sources. Each of these services enables simple self-service data ingestion into the data lake landing zone and provides integration with other AWS services in the storage and security layers. Individual purpose-built AWS services match the unique connectivity, data format, data structure, and data velocity requirements of operational database sources, streaming data sources, and file sources.

Operational database sources

Typically, organizations store their operational data in various relational and NoSQL databases. AWS Data Migration Service (AWS DMS) can connect to a variety of operational RDBMS and NoSQL databases and ingest their data into Amazon Simple Storage Service (Amazon S3) buckets in the data lake landing zone. With AWS DMS, you can first perform a one-time import of the source data into the data lake and replicate ongoing changes happening in the source database. AWS DMS encrypts S3 objects using AWS Key Management Service (AWS KMS) keys as it stores them in the data lake. AWS DMS is a fully managed, resilient service and provides a wide choice of instance sizes to host database replication tasks.

AWS Lake Formation provides a scalable, serverless alternative, called blueprints, to ingest data from AWS native or on-premises database sources into the landing zone in the data lake. A Lake Formation blueprint is a predefined template that generates a data ingestion AWS Glue workflow based on input parameters such as source database, target Amazon S3 location, target dataset format, target dataset partitioning columns, and schedule. A blueprint-generated AWS Glue workflow implements an optimized and parallelized data ingestion pipeline consisting of crawlers, multiple parallel jobs, and triggers connecting them based on conditions. For more information, see Integrating AWS Lake Formation with Amazon RDS for SQL Server.

Streaming data sources

The ingestion layer uses Amazon Kinesis Data Firehose to receive streaming data from internal and external sources. With a few clicks, you can configure a Kinesis Data Firehose API endpoint where sources can send streaming data such as clickstreams, application and infrastructure logs and monitoring metrics, and IoT data such as devices telemetry and sensor readings. Kinesis Data Firehose does the following:

  • Buffers incoming streams
  • Batches, compresses, transforms, and encrypts the streams
  • Stores the streams as S3 objects in the landing zone in the data lake

Kinesis Data Firehose natively integrates with the security and storage layers and can deliver data to Amazon S3, Amazon Redshift, and Amazon Elasticsearch Service (Amazon ES) for real-time analytics use cases. Kinesis Data Firehose is serverless, requires no administration, and has a cost model where you pay only for the volume of data you transmit and process through the service. Kinesis Data Firehose automatically scales to adjust to the volume and throughput of incoming data.

File sources

Many applications store structured and unstructured data in files that are hosted on Network Attached Storage (NAS) arrays. Organizations also receive data files from partners and third-party vendors. Analyzing data from these file sources can provide valuable business insights.

Internal file shares

AWS DataSync can ingest hundreds of terabytes and millions of files from NFS and SMB enabled NAS devices into the data lake landing zone. DataSync automatically handles scripting of copy jobs, scheduling and monitoring transfers, validating data integrity, and optimizing network utilization. DataSync can perform one-time file transfers and monitor and sync changed files into the data lake. DataSync is fully managed and can be set up in minutes.

Partner data files

FTP is most common method for exchanging data files with partners. The AWS Transfer Family is a serverless, highly available, and scalable service that supports secure FTP endpoints and natively integrates with Amazon S3. Partners and vendors transmit files using SFTP protocol, and the AWS Transfer Family stores them as S3 objects in the landing zone in the data lake. The AWS Transfer Family supports encryption using AWS KMS and common authentication methods including AWS Identity and Access Management (IAM) and Active Directory.

Data APIs

Organizations today use SaaS and partner applications such as Salesforce, Marketo, and Google Analytics to support their business operations. Analyzing SaaS and partner data in combination with internal operational application data is critical to gaining 360-degree business insights. Partner and SaaS applications often provide API endpoints to share data.

SaaS APIs

The ingestion layer uses AWS AppFlow to easily ingest SaaS applications data into the data lake. With a few clicks, you can set up serverless data ingestion flows in AppFlow. Your flows can connect to SaaS applications (such as SalesForce, Marketo, and Google Analytics), ingest data, and store it in the data lake. You can schedule AppFlow data ingestion flows or trigger them by events in the SaaS application. Ingested data can be validated, filtered, mapped and masked before storing in the data lake. AppFlow natively integrates with authentication, authorization, and encryption services in the security and governance layer.

Partner APIs

To ingest data from partner and third-party APIs, organizations build or purchase custom applications that connect to APIs, fetch data, and create S3 objects in the landing zone by using AWS SDKs. These applications and their dependencies can be packaged into Docker containers and hosted on AWS Fargate. Fargate is a serverless compute engine for hosting Docker containers without having to provision, manage, and scale servers. Fargate natively integrates with AWS security and monitoring services to provide encryption, authorization, network isolation, logging, and monitoring to the application containers.

AWS Glue Python shell jobs also provide serverless alternative to build and schedule data ingestion jobs that can interact with partner APIs by using native, open-source, or partner-provided Python libraries. AWS Glue provides out-of-the-box capabilities to schedule singular Python shell jobs or include them as part of a more complex data ingestion workflow built on AWS Glue workflows.

Third-party data sources

Your organization can gain a business edge by combining your internal data with third-party datasets such as historical demographics, weather data, and consumer behavior data. AWS Data Exchange provides a serverless way to find, subscribe to, and ingest third-party data directly into S3 buckets in the data lake landing zone. You can ingest a full third-party dataset and then automate detecting and ingesting revisions to that dataset. AWS Data Exchange is serverless and lets you find and ingest third-party datasets with a few clicks.

Storage layer

Amazon S3 provides the foundation for the storage layer in our architecture. Amazon S3 provides virtually unlimited scalability at low cost for our serverless data lake. Data is stored as S3 objects organized into landing, raw, and curated zone buckets and prefixes. Amazon S3 encrypts data using keys managed in AWS KMS. IAM policies control granular zone-level and dataset-level access to various users and roles. Amazon S3 provides 99.99 % of availability and 99.999999999 % of durability, and charges only for the data it stores. To significantly reduce costs, Amazon S3 provides colder tier storage options called Amazon S3 Glacier and S3 Glacier Deep Archive. To automate cost optimizations, Amazon S3 provides configurable lifecycle policies and intelligent tiering options to automate moving older data to colder tiers. AWS services in our ingestion, cataloging, processing, and consumption layers can natively read and write S3 objects. Additionally, hundreds of third-party vendor and open-source products and services provide the ability to read and write S3 objects.

Data of any structure (including unstructured data) and any format can be stored as S3 objects without needing to predefine any schema. This enables services in the ingestion layer to quickly land a variety of source data into the data lake in its original source format. After the data is ingested into the data lake, components in the processing layer can define schema on top of S3 datasets and register them in the cataloging layer. Services in the processing and consumption layers can then use schema-on-read to apply the required structure to data read from S3 objects. Datasets stored in Amazon S3 are often partitioned to enable efficient filtering by services in the processing and consumption layers.

Cataloging and search layer

A data lake typically hosts a large number of datasets, and many of these datasets have evolving schema and new data partitions. A central Data Catalog that manages metadata for all the datasets in the data lake is crucial to enabling self-service discovery of data in the data lake. Additionally, separating metadata from data into a central schema enables schema-on-read for the processing and consumption layer components.

In our architecture, Lake Formation provides the central catalog to store and manage metadata for all datasets hosted in the data lake. Organizations manage both technical metadata (such as versioned table schemas, partitioning information, physical data location, and update timestamps) and business attributes (such as data owner, data steward, column business definition, and column information sensitivity) of all their datasets in Lake Formation. Services such as AWS Glue, Amazon EMR, and Amazon Athena natively integrate with Lake Formation and automate discovering and registering dataset metadata into the Lake Formation catalog. Additionally, Lake Formation provides APIs to enable metadata registration and management using custom scripts and third-party products. AWS Glue crawlers in the processing layer can track evolving schemas and newly added partitions of datasets in the data lake, and add new versions of corresponding metadata in the Lake Formation catalog.

Lake Formation provides the data lake administrator a central place to set up granular table- and column-level permissions for databases and tables hosted in the data lake. After Lake Formation permissions are set up, users and groups can access only authorized tables and columns using multiple processing and consumption layer services such as Athena, Amazon EMR, AWS Glue, and Amazon Redshift Spectrum.

Processing layer

The processing layer in our architecture is composed of two types of components:

  • Components used to create multi-step data processing pipelines
  • Components to orchestrate data processing pipelines on schedule or in response to event triggers (such as ingestion of new data into the landing zone)

AWS Glue and AWS Step Functions provide serverless components to build, orchestrate, and run pipelines that can easily scale to process large data volumes. Multi-step workflows built using AWS Glue and Step Functions can catalog, validate, clean, transform, and enrich individual datasets and advance them from landing to raw and raw to curated zones in the storage layer.

AWS Glue is a serverless, pay-per-use ETL service for building and running Python or Spark jobs (written in Scala or Python) without requiring you to deploy or manage clusters. AWS Glue automatically generates the code to accelerate your data transformations and loading processes. AWS Glue ETL builds on top of Apache Spark and provides commonly used out-of-the-box data source connectors, data structures, and ETL transformations to validate, clean, transform, and flatten data stored in many open-source formats such as CSV, JSON, Parquet, and Avro. AWS Glue ETL also provides capabilities to incrementally process partitioned data.

Additionally, you can use AWS Glue to define and run crawlers that can crawl folders in the data lake, discover datasets and their partitions, infer schema, and define tables in the Lake Formation catalog. AWS Glue provides more than a dozen built-in classifiers that can parse a variety of data structures stored in open-source formats. AWS Glue also provides triggers and workflow capabilities that you can use to build multi-step end-to-end data processing pipelines that include job dependencies and running parallel steps. You can schedule AWS Glue jobs and workflows or run them on demand. AWS Glue natively integrates with AWS services in storage, catalog, and security layers.

Step Functions is a serverless engine that you can use to build and orchestrate scheduled or event-driven data processing workflows. You use Step Functions to build complex data processing pipelines that involve orchestrating steps implemented by using multiple AWS services such as AWS Glue, AWS Lambda, Amazon Elastic Container Service (Amazon ECS) containers, and more. Step Functions provides visual representations of complex workflows and their running state to make them easy to understand. It manages state, checkpoints, and restarts of the workflow for you to make sure that the steps in your data pipeline run in order and as expected. Built-in try/catch, retry, and rollback capabilities deal with errors and exceptions automatically.

Consumption layer

The consumption layer in our architecture is composed using fully managed, purpose-built, analytics services that enable interactive SQL, BI dashboarding, batch processing, and ML.

Interactive SQL

Athena is an interactive query service that enables you to run complex ANSI SQL against terabytes of data stored in Amazon S3 without needing to first load it into a database. Athena queries can analyze structured, semi-structured, and columnar data stored in open-source formats such as CSV, JSON, XML Avro, Parquet, and ORC. Athena uses table definitions from Lake Formation to apply schema-on-read to data read from Amazon S3.

Athena is serverless, so there is no infrastructure to set up or manage, and you pay only for the amount of data scanned by the queries you run. Athena provides faster results and lower costs by reducing the amount of data it scans by using dataset partitioning information stored in the Lake Formation catalog. You can run queries directly on the Athena console of submit them using Athena JDBC or ODBC endpoints.

Athena natively integrates with AWS services in the security and monitoring layer to support authentication, authorization, encryption, logging, and monitoring. It supports table- and column-level access controls defined in the Lake Formation catalog.

Data warehousing and batch analytics

Amazon Redshift is a fully managed data warehouse service that can host and process petabytes of data and run thousands highly performant queries in parallel. Amazon Redshift uses a cluster of compute nodes to run very low-latency queries to power interactive dashboards and high-throughput batch analytics to drive business decisions. You can run Amazon Redshift queries directly on the Amazon Redshift console or submit them using the JDBC/ODBC endpoints provided by Amazon Redshift.

Amazon Redshift provides the capability, called Amazon Redshift Spectrum, to perform in-place queries on structured and semi-structured datasets in Amazon S3 without needing to load it into the cluster. Amazon Redshift Spectrum can spin up thousands of query-specific temporary nodes to scan exabytes of data to deliver fast results. Organizations typically load most frequently accessed dimension and fact data into an Amazon Redshift cluster and keep up to exabytes of structured, semi-structured, and unstructured historical data in Amazon S3. Amazon Redshift Spectrum enables running complex queries that combine data in a cluster with data on Amazon S3 in the same query.

Amazon Redshift provides native integration with Amazon S3 in the storage layer, Lake Formation catalog, and AWS services in the security and monitoring layer.

Business intelligence

Amazon QuickSight provides a serverless BI capability to easily create and publish rich, interactive dashboards. QuickSight enriches dashboards and visuals with out-of-the-box, automatically generated ML insights such as forecasting, anomaly detection, and narrative highlights. QuickSight natively integrates with Amazon SageMaker to enable additional custom ML model-based insights to your BI dashboards. You can access QuickSight dashboards from any device using a QuickSight app, or you can embed the dashboard into web applications, portals, and websites.

QuickSight allows you to directly connect to and import data from a wide variety of cloud and on-premises data sources. These include SaaS applications such as Salesforce, Square, ServiceNow, Twitter, GitHub, and JIRA; third-party databases such as Teradata, MySQL, Postgres, and SQL Server; native AWS services such as Amazon Redshift, Athena, Amazon S3, Amazon Relational Database Service (Amazon RDS), and Amazon Aurora; and private VPC subnets. You can also upload a variety of file types including XLS, CSV, JSON, and Presto.

To achieve blazing fast performance for dashboards, QuickSight provides an in-memory caching and calculation engine called SPICE. SPICE automatically replicates data for high availability and enables thousands of users to simultaneously perform fast, interactive analysis while shielding your underlying data infrastructure. QuickSight automatically scales to tens of thousands of users and provides a cost-effective, pay-per-session pricing model.

QuickSight allows you to securely manage your users and content via a comprehensive set of security features, including role-based access control, active directory integration, AWS CloudTrail auditing, single sign-on (IAM or third-party), private VPC subnets, and data backup.

Predictive analytics and ML

Amazon SageMaker is a fully managed service that provides components to build, train, and deploy ML models using an interactive development environment (IDE) called Amazon SageMaker Studio. In Amazon SageMaker Studio, you can upload data, create new notebooks, train and tune models, move back and forth between steps to adjust experiments, compare results, and deploy models to production, all in one place by using a unified visual interface. Amazon SageMaker also provides managed Jupyter notebooks that you can spin up with just a few clicks. Amazon SageMaker notebooks provide elastic compute resources, git integration, easy sharing, pre-configured ML algorithms, dozens of out-of-the-box ML examples, and AWS Marketplace integration, which enables easy deployment of hundreds of pre-trained algorithms. Amazon SageMaker notebooks are preconfigured with all major deep learning frameworks, including TensorFlow, PyTorch, Apache MXNet, Chainer, Keras, Gluon, Horovod, Scikit-learn, and Deep Graph Library.

ML models are trained on Amazon SageMaker managed compute instances, including highly cost-effective Amazon Elastic Compute Cloud (Amazon EC2) Spot Instances. You can organize multiple training jobs by using Amazon SageMaker Experiments. You can build training jobs using Amazon SageMaker built-in algorithms, your custom algorithms, or hundreds of algorithms you can deploy from AWS Marketplace. Amazon SageMaker Debugger provides full visibility into model training jobs. Amazon SageMaker also provides automatic hyperparameter tuning for ML training jobs.

You can deploy Amazon SageMaker trained models into production with a few clicks and easily scale them across a fleet of fully managed EC2 instances. You can choose from multiple EC2 instance types and attach cost-effective GPU-powered inference acceleration. After the models are deployed, Amazon SageMaker can monitor key model metrics for inference accuracy and detect any concept drift.

Amazon SageMaker provides native integrations with AWS services in the storage and security layers.

Security and governance layer

Components across all layers of our architecture protect data, identities, and processing resources by natively using the following capabilities provided by the security and governance layer.

Authentication and authorization

IAM provides user-, group-, and role-level identity to users and the ability to configure fine-grained access control for resources managed by AWS services in all layers of our architecture. IAM supports multi-factor authentication and single sign-on through integrations with corporate directories and open identity providers such as Google, Facebook, and Amazon.

Lake Formation provides a simple and centralized authorization model for tables hosted in the data lake. After implemented in Lake Formation, authorization policies for databases and tables are enforced by other AWS services such as Athena, Amazon EMR, QuickSight, and Amazon Redshift Spectrum. In Lake Formation, you can grant or revoke database-, table-, or column-level access for IAM users, groups, or roles defined in the same account hosting the Lake Formation catalog or another AWS account. The simple grant/revoke-based authorization model of Lake Formation considerably simplifies the previous IAM-based authorization model that relied on separately securing S3 data objects and metadata objects in the AWS Glue Data Catalog.

Encryption

AWS KMS provides the capability to create and manage symmetric and asymmetric customer-managed encryption keys. AWS services in all layers of our architecture natively integrate with AWS KMS to encrypt data in the data lake. It supports both creating new keys and importing existing customer keys. Access to the encryption keys is controlled using IAM and is monitored through detailed audit trails in CloudTrail.

Network protection

Our architecture uses Amazon Virtual Private Cloud (Amazon VPC) to provision a logically isolated section of the AWS Cloud (called VPC) that is isolated from the internet and other AWS customers. AWS VPC provides the ability to choose your own IP address range, create subnets, and configure route tables and network gateways. AWS services from other layers in our architecture launch resources in this private VPC to protect all traffic to and from these resources.

Monitoring and logging

AWS services in all layers of our architecture store detailed logs and monitoring metrics in AWS CloudWatch. CloudWatch provides the ability to analyze logs, visualize monitored metrics, define monitoring thresholds, and send alerts when thresholds are crossed.

All AWS services in our architecture also store extensive audit trails of user and service actions in CloudTrail. CloudTrail provides event history of your AWS account activity, including actions taken through the AWS Management Console, AWS SDKs, command line tools, and other AWS services. This event history simplifies security analysis, resource change tracking, and troubleshooting. In addition, you can use CloudTrail to detect unusual activity in your AWS accounts. These capabilities help simplify operational analysis and troubleshooting.

Additional considerations

In this post, we talked about ingesting data from diverse sources and storing it as S3 objects in the data lake and then using AWS Glue to process ingested datasets until they’re in a consumable state. This architecture enables use cases needing source-to-consumption latency of a few minutes to hours. In a future post, we will evolve our serverless analytics architecture to add a speed layer to enable use cases that require source-to-consumption latency in seconds, all while aligning with the layered logical architecture we introduced.

Conclusion

With AWS serverless and managed services, you can build a modern, low-cost data lake centric analytics architecture in days. A decoupled, component-driven architecture allows you to start small and quickly add new purpose-built components to one of six architecture layers to address new requirements and data sources.

We invite you to read the following posts that contain detailed walkthroughs and sample code for building the components of the serverless data lake centric analytics architecture:


About the Authors

Praful Kava is a Sr. Specialist Solutions Architect at AWS. He guides customers to design and engineer Cloud scale Analytics pipelines on AWS. Outside work, he enjoys travelling with his family and exploring new hiking trails.

Changbin Gong is a Senior Solutions Architect at Amazon Web Services (AWS). He engages with customers to create innovative solutions that address customer business problems and accelerate the adoption of AWS services. In his spare time, Changbin enjoys reading, running, and traveling.

Now generally available – design and visualize Amazon Keyspaces data models more easily by using NoSQL Workbench

$
0
0

Feed: Recent Announcements.

Designing scalable data models is essential to building massive-scale, operational, nonrelational databases. However, designing data models can be challenging, particularly when designing data models for new applications that have data access patterns you are still developing. With NoSQL Workbench for Amazon Keyspaces, you can create new data models from scratch by defining keyspaces, tables, and columns. You also can import existing data models to adapt them for new applications, and make modifications such as adding, editing, or removing columns. You then can commit the data models to Amazon Keyspaces or Cassandra, and create the keyspaces and tables automatically.  

Using NoSQL Workbench, you also can visualize your data models to help ensure that the data models can support your application’s queries and access patterns. You can save and export data models in a variety of formats for collaboration, documentation, and presentations. 

NoSQL Workbench is free to download, and is available for Windows, macOS, and Linux. To get started, download NoSQL Workbench.  

SingleStore for Fastboards

$
0
0

Feed: SingleStore Blog – MemSQL is Now SingleStore.
Author: Sarung Tripathi.

Introduction

Over the last many years, analytical dashboards have proliferated enterprises from the boardroom to the manufacturing line. As businesses have become increasingly more reliant on analytics, end users have started to demand snappier performance from their dashboards. Gone are the days that visualizations are used simply for historical data. Data professionals are now using them for predictive and prescriptive analytics on petabytes of information, expecting the most real-time insights to tell their data stories.

Many organizations across consumer products, healthcare, fintech and other verticals have been met with the challenge of slow moving BI applications in recent years, due to the growth of data and many new types of users. Backend platforms are often retooled for each use case and still are unable to handle the growing concurrency demands of the business. This leads to applications that take too long to render and users that are faced with the dreaded “loading” pinwheel.

The Pain

The challenge of slow-running dashboards is not limited to legacy systems. Users experience slow dashboards when their applications are backed by legacy architectures as well as by more modern database systems. The pain points that enterprises face with legacy architectures start with the original intent of those systems: to support historical reporting and batch-oriented dashboards. Many databases from vendors like Oracle were built around a different era of business demands — when operational decisions were not made through data visualization. Over time, other (now legacy) systems like SQL Server emerged to help with transactional processing of data. This spread of new database systems purpose-built by workload introduced put even more stress on ETL technologies. The Hadoop era aimed to solve this, but ultimately consumers were left at the mercy of too many different systems for data to reside in and excessive data duplication across those silos. This made data storytelling very difficult. 

The Challenge of Legacy Architectures

The struggle with legacy data systems has been even further exposed with the emergence of streaming data. Data is now being unlocked from chatty systems like e-commerce systems, financial trades, and oil and gas machinery. Real-time data pipelines from messaging infrastructures like Kafka, Kinesis, Pulsar and others have put an even greater burden on old, slow databases. Users expect the data from these applications to be readily available in real-time and operational dashboards, often combined with historical reference data. Instead, they end up stuck with dashboards struggling to load data for critical business decisioning. 

Introducing Streaming Data

The challenges that legacy data platforms faced in the face of the growing base of analytics users has been met with the advent of modern data platforms. These platforms tout a new focus toward analytics, AI and machine learning. While modern data platforms still tend to specialize in OLTP or OLAP workloads, data platform vendors are adding even further delineation on the lines of data type — MongoDB specializes in document data, Redis for key-value data, etc. This approach works very well for application data that can often be unstructured and transactional. However, tying together multiple single-purpose databases for a unified visual experience remains extremely slow, and thus data stories end up very disjointed. 

Cloud data warehouses have started to solve this problem, but scaling to satisfy an enterprise-scale analytics audience and handling operational data with platforms like Snowflake has proven to be extremely costly. This concern is primarily rooted in unpredictable compute costs as more and more users start accessing these dashboards. As more users come onto the platform, response times also become far less consistent. Ultimately, consumers end up losing the low latency response they were promised and organizations still end up spending more than expected.

Finally, organizations also try to solve their dashboard needs with a data federation approach. Federation vendors often tout the ability to have a single point of data access to all data sources. Unfortunately, this typically gets customers in more trouble due to 1) the high costs of procuring this technology and hosting it on very large servers, 2) a single point of failure, and 3) a newly introduced bottleneck which slows down dashboards even more. 

Introducing Modern Data Platforms, and their challenges

The pains faced by dashboard users and the engineers behind them can very often be linked back to the monolithic legacy systems that they are architected upon, or often the overindulgence in new, single-purpose data platform technology. Accelerating those dashboards, and tuning your systems to be ready for fastboards requires a scalable, general purpose database built for fast data ingestion and limitless amounts of users. SingleStore Managed Service is built for fastboards. 

SingleStore Managed Service

SingleStore’s database-as-a-service offering is called SingleStore Managed Service. Our platform is a distributed, highly-scalable, cloud-native SQL database built for fastboards. SingleStore is designed for highly performant ingest of any operational data, whether it is batch or streaming in nature. We make ingesting your data incredibly easy through SingleStore Pipelines, your way to get data from anywhere with five lines of SQL. Data can be brought from many different source systems like S3, Kafka, Azure Blob, etc. and streamed in parallel to make your data instantaneously queryable upon ingest.

SingleStore offers a singular table type for all of your data storytelling needs. SingleStore’s architecture allows you to support large-scale Online Transaction Processing (OLTP) and Hybrid Transactional and Analytical Processing (HTAP) at a lower total cost of ownership. It is a continuing evolution of the columnstore, supporting transactional workloads that would have traditionally used the rowstore. With the ability to seek millions of rows at a time, scan billions, and compress your data 10X — SingleStore is the ultimate solution for fastboards. Most importantly, SingleStore Managed Service is a converged data platform that can store data of any type, JSON, time-series, key-value, etc — all with SQL. 

Here at SingleStore, we believe many modern data platforms can coexist. Many of our customers leverage in-memory, NoSQL technologies for their mobile applications and relational, cloud EDWs for long-term storage of their data. However, when it comes to accelerating the most critical business insights driven by analytics, AI and machine learning, they turn to SingleStore. 

Our Managed Service can help you extend your legacy platforms like Oracle and Teradata with fast ingest and querying, complement Snowflake and BigQuery without unpredictable costs, and onboard any new type of data without the constraints of NoSQL databases. 

SingleStore Managed Service: The Data Platform for Fastboards

What kinds of dashboards?

As discussed, SingleStore is a fantastic choice for your most important visualization and analytics needs. The following section goes a bit deeper into exactly what types of dashboards SingleStore is powering today, and some of the important concepts. 

SingleStore is the core data platform for many analytical applications: 

  • Real-Time Analytics 
  • Operational BI
  • Historical Reporting
  • ML-Driven Analytics
  • Ad-Hoc Data Discovery, and many more

Real-time dashboards are used to make critical business decisions in the moment. They often require sub-minute or sub-second latency, and are highly relevant in preventative maintenance, inventory and IoT applications. These types of workloads benefit greatly from SingleStore’s streaming ingestion, built-in predictive capabilities, and scalable analytics. SingleStore’s ability to quickly ingest high volumes of data, rapidly run predictive models for scoring, and store for fast retrieval makes it best in class for real-time dashboards. Medaxion leverages SingleStore to achieve hospital event to insight within 30 seconds.

Historical Reporting dashboards encompass both the most recent data as well as long-term insights. They are often found supporting financial reporting and historical sales analytics use cases. SingleStore offers a number of different features that accelerate historical dashboards — drop-in SQL compatibility, scalable analytics functions, and built-in machine learning to name a few. SingleStore makes it extremely simple for dashboard developers to deliver high-quality, fast historical analytics for end consumers. Kellogg uses the SingleStore platform to accelerate the speed of their Tableau dashboards by 80X.

Over time, we have seen machine learning and AI emerge to the forefront of analytics ecosystems and thus, visualizing ML through visualization has become a common way to share the performance of models. These dashboards are meant to provide a beautiful visual interface for otherwise complex data science workflows. They are often used to help executives and business people align with an organization’s predictive capabilities. At SingleStore, we see many of our customers leveraging our ML-enabled pipelines to score and visualize data in real-time. Users also leverage built-in predictive functions and our SingleStore capabilities to perform training and testing at large scale. 

Tools

Having discussed many different variations of fastboard use cases, it is also important to address the vast landscape of tools and technologies that enable these. Furthermore, there is no feature more important for a database than seamless, performant connectivity to every dashboarding tool. SingleStore is wire protocol compatible with MySQL making it instantly accessible from any BI tool such as Tableau, PowerBI or Looker and with widely-available bindings to popular programming languages such as R and Python. We also have native connectors for many dashboarding tools, purpose-built for accelerating the speed of your dashboards. Many of our customers have also found success custom building their dashboards using frameworks such as React, in architectures where SingleStore acts as a performant API-backend. 

Summary

Here at SingleStore, we understand that fastboards may come in all shapes and sizes, and that each use case is unique. As discussed above, our ability to approach more fastboard use cases than any other database is rooted in our native SQL compatibility, SingleStore engine, streaming ingest and vast predictive capabilities. 

SingleStore Managed Service can empower modern data platforms with fastboards in order to achieve faster, more informed decisions, and improved customer experiences. We invite you to explore how some of our customers are powering their fastboards to tell rich data stories here.

Nucleus Security & SingleStore Partner to Manage Vulnerabilities at Scale

$
0
0

Feed: SingleStore Blog – MemSQL is Now SingleStore.
Author: Domenic Ravita.

Nucleus Security needed a much faster, more capable database than anything they had previously known of to deliver optimal performance for their new security offering – a vulnerability management platform. They found the database they needed, SingleStore, and have reached the market with a winning solution. 

The founders of Nucleus had decades of experience in the field of vulnerability management when they set out to develop a new platform to address a gap in the market. They knew from experience that building a vulnerability management platform that scales to meet the needs of large enterprises would be one the hardest technical challenges they would face. Co-founder Steve Carter explains: “Several vendors have tried to build vulnerability management products that scale, but nothing in the market actually did. Then we found SingleStore, which allows us to handle customers 10 times the size, and to be ready for future growth as well. For years, large enterprises and managed service security providers have been looking for a vulnerability management solution that can scale; many had tried to build such a platform themselves. Now we have it, thanks to SingleStore, and we are growing rapidly. ”

When Nucleus began architecting the Nucleus platform, they explored several database options, including document-oriented databases, graph databases, and traditional relational databases. Carter says, “All of the options had their strengths and weaknesses, and we felt that several database technologies could work well for the initial proof of concept. However, it quickly became apparent that a high-performance relational database system was a hard requirement to support our data model and the features we were planning to bring to market. We set out to find the best available.” 

A Widely Known Business Need

The co-founders of Nucleus, Stephen Carter and Scott Kuffer, had been doing vulnerability management for the US government. They had worked on large systems across multiple agencies. They used a variety of vulnerability scanning tools, each of which has their relative strengths. When vulnerabilities are discovered, they have to go into a ticketing system for remediation, such as Jira or ServiceNow. There was a gap between the identification of vulnerabilities and the creation of tickets. The vulnerability reports need to be normalized across a range of formats used by different tools, and prioritized by the user. The response then needs to be automated, for greater speed and manageability. 

The same need is experienced by two very different kinds of potential customers. The first is large enterprises, including companies and government agencies. The larger the enterprise, the more likely they are to have the need to manage security vulnerability at scale. The second is managed service security providers (MSSP). These providers work with multiple clients, where the client has outsourced security tasks to the MSSP. MSSPs needed a platform they could use, give their clients access to, and ideally extend with their own proprietary functionality. 

Nucleus set out to create such a solution. They started out developing the solution they would have needed when they were working directly with government agencies. These clients are highly focused on compliance, and might run scans weekly or monthly, as required by the regulations under which they operate. The database solutions that Nucleus tried often took a long time to process vulnerabilities, but at a weekly or monthly cadence, this wasn’t a big issue. 

The acid test came when Nucleus started talking to more demanding clients, including commercial clients. These potential customers often scan many times a day. They wanted to see the results of a scan incorporated in the Nucleus user interface in minutes, not hours (or even longer). This is when Nucleus knew they needed a much better database solution. 

Old Architecture Using MariaDB

The Nucleus application is delivered as a software-as-a-service (SaaS) offering, and is designed as a traditional three-tier architecture. “There’s a web application, which is customer-facing, and a job queue that processes data. Then there’s a database on the backend, serving both,” says Scott. 

The Nucleus prototype used MariaDB, which is on many federal government approved software lists. “MariaDB comes bundled with the government-approved operating system we were using, which is Red Hat Linux,” said Stephen. For the prototype, this worked just fine. But when we started to onboard larger customers, we hit some ceilings performance-wise, and some pretty major performance issues.” 

“We knew we needed a relational database. Our data is assets tied to findings tied to scans tied to scan dates and times, so the best way is a relational database,” said Scott. Nucleus performs a range of analytics on every scan they ingest. “As a workaround” – for slow MariaDB performance – “we were trying to precalculate a bunch of stuff, to show it in the UI. But if you’re scanning every hour, and it takes an hour and a half to do the calculations, then you get a huge backlog.” 

“It was the database that was the bottleneck all along,” added Stephen. “We looked at some NoSQL solutions. We looked at Percona for clustering, but we would have had to rewrite a lot of our code – and all of our queries.” Nucleus also investigated other SQL solutions based on PostgreSQL core, like Greenplum.

The MariaDB database was the primary bottleneck from the beginning. The team spent a lot of time tuning queries to squeeze out every bit of performance that they could to keep up with the performance needed for their beta customers. However, even with the clustering and load-balanced configurations available, it was clear that a different database solution would be needed for Nucleus to support very large enterprises, which have hundreds of thousands of devices and tens of millions of vulnerabilities.

The Move to SingleStore

Nucleus found SingleStore by searching for a fast, relational database that would serve as an alternative to Percona, which did not meet their needs. SingleStore impressed Nucleus from the start. 

“SingleStore was a great option, because SingleStore is not only relational; it also supports the MySQL wire protocol, which of course is inherent in MariaDB,” said Stephen. “It was almost a drop-in replacement for MariaDB, and it’s way less complex, and also much easier to maintain than the Percona cluster solution that we were looking at.”

SingleStore meets all of Nucleus’ needs, with MySQL/MariaDB syntax support, data sharding, and the ability to parallelize their highly complex queries. “We started by importing our largest tables from MariaDB and running our slowest queries. Without any schema or query changes the queries ran between 2 – 20x faster. We migrated a development database to SingleStore and had the Nucleus application working without any code changes in an afternoon. At that point, we knew we had found the right solution,” continued Stephen.

“We migrated about 100GB of data – but with SingleStore’s compression, that same data only required about 5GB. Instantly, we were able to handle customers 5 – 10x the size of our beta customers, with the same hardware,” added Stephen. “Even better, we now have the ability to scale out the database to support the largest of enterprises. You just add another machine, double your CPU and RAM, and now everything’s running again – but twice as fast!” 

“We had previously been having issues with a 5,000 asset scan, and that was taking 2-3 hours. Now we can ingest a scan of 100,000 assets with no problem, in about 45 minutes.” That’s a performance improvement of roughly 50 times. “And we estimate that we’re at about one-third of the AWS costs we would have needed, if we’d used Percona.” 

No Architectural Changes

The Nucleus app brings in data directly from the APIs of vulnerability scanning tools used by customers, and interacts directly with their job scheduling systems, such as Jira or ServiceNow, directly. There’s no need, at this time, to use Kafka or other streaming technologies. 

Nucleus did not need to make any architectural changes to their application to move to SingleStore; it has served as a drop-in replacement for MariaDB. Since MySQL wire compatibility is shared by both, making the move was easy. By replacing MariaDB with SingleStore, Nucleus customers can now support MSSPs with full scalability.

Reference Architecture: Nucleus replacing MariaDB with SingleStore 

The Nucleus team did not need to make any architectural changes to move to SingleStore, and they describe using SingleStore as “dead simple.” Stephen said, “It was dead simple to get set up. Whereas, I’ve got experience getting Oracle database clusters set up, and those things can be nightmares. And our experience with SingleStore was very good. We do not spend a lot of time maintaining it, troubleshooting it. Anyone that’s using MariaDB, we would recommend it to. No question.”

Learn more from this Linkedin event: The Know Show – Nucleus Security & SingleStore

What’s Next for Nucleus?

As a company with a quickly expanding customer base, Nucleus is just getting started. Constantly building features around aggregating vulnerability data from a growing list of 50+ sources, Nucleus must continuously evolve to keep up with increasing volumes of data generated by enterprise vulnerability scanning tools. Nucleus will continue to work closely with the SingleStore team and looks forward to the new features of SingleStore to power the growth of its platform.

If you’re interested in trying the power of SingleStore for yourself, you can run SingleStore for free or contact us.

One Thousand Orders Per Minute: Peak Retail Planning and Architecture from VTEX and Grupo Éxito

$
0
0

Feed: AWS Partner Network (APN) Blog.
Author: Por Sorana Gheorghiade.

By Sorana Gheorghiade, Marketing Associate at VTEX

Grupo Éxito is one of the biggest retailers in Latin America, with more than 2,600 physical retail stores across the continent that use VTEX to sell a wide range of products, from grocery and appliances to fashion and accessories.

In 2019, Éxito chose to migrate from Oracle ATG to VTEX and move their operations to a more flexible software-as-a-service (SaaS) platform. VTEX’s decade-long collaboration with Amazon Web Services (AWS) proved to be a decisive factor for Éxito.

On Monday, May 19, 2020, the Colombian government announced they were removing value-added tax (VAT, or IVA in Spanish) from select retail categories during three 24-hour events to help boost the economy post COVID-19 lockdown.

With VAT in Colombia at 19 percent, this entailed a significant discount off normal prices, with retailers anticipating a huge increase in transactions on those days.

VTEX, working alongside AWS, became a key business partner for over 200 Colombian stores, capable of supporting the traffic and order peaks generated by these new retail events, and helped retailers regain their pre-pandemic growth quotas.

VTEX is an AWS Advanced Technology Partner with the AWS Retail Competency. We help companies in retail, manufacturing, wholesale, groceries, consumer packaged goods, and other verticals to sell more, operate more efficiently, scale seamlessly, and deliver remarkable customer experience.

VTEX’s modern microservices-based architecture and powerful business and developer tools allow the company to future-proof customers’ businesses and free them from software updates.

Customer Challenge

The first two VAT-free events (or Día sin IVA, in Spanish) took place on June 19 and July 3, 2020. Grupo Éxito’s orders and sessions skyrocketed, reaching more than 1,000 orders per minute. Accommodating an unprecedented amount of transactions on such short notice posed a challenge for the average retailer in Colombia.

One of the main concerns of every online retailer during high traffic events is the platform’s capacity and recovery time in case of a crash. With VTEX’s tools supported by AWS services, Grupo Éxito had nothing to worry about.

Éxito’s site is powered by VTEX IO, a serverless development platform built on AWS. This blueprint of interdependencies, where AWS provides VTEX with the right cloud features to respond to Exito’s online business demands, made preparing for and selling during the tax-free days event a smooth and flawless process. The key to this achievement was scalability.

Why VTEX Builds on AWS

There has been a rise in the number of specialized cloud services that aid industries in creating value by being easily configured to meet specific business requirements. VTEX, in particular, has been working with AWS for the past 10 years. Their platform runs its multi-tenant stack on AWS, which grants enough flexibility (scaling both vertically and horizontally) to cater to customers’ needs, especially during high volume events.

There are many reasons why the collaboration between VTEX and AWS works. The VTEX team is always ready to discover new functionalities within AWS that boost VTEX’s own architecture. Learning from experience and from AWS, VTEX has developed expertise in cloud and advanced web microservices ahead of other platforms on the market.

This collaboration laid the foundation of a multi-tenant SaaS solution, capable of simplifying decisions regarding infrastructure for over 3,000 stores in 42 countries.

Over the last couple of years, VTEX launched VTEX IO, an enterprise low-code development platform with tools that offer scalable and personalized application deployment for merchants to achieve their business goals faster.

VTEX-Grupo-Exito-Retail-1

Why Grupo Éxito Chose VTEX

As a multi-tenant platform, every service that VTEX uses from AWS is available to all its customers.

VTEX uses AWS Elastic Beanstalk to scale out resources and split responsibilities, and AWS WAF and Amazon CloudFront to handle all of the edge load. VTEX also uses Amazon Relational Database Service (Amazon RDS) for databases, Amazon Elasticsearch Service for NoSQL data, Redis for cache, and Elastic Load Balancing and others that facilitate the process of perfecting the platform to drive the best results for customers.

When you think about scalability, what probably comes to mind are the many different services running concomitantly on the platform. When you think about e-commerce, it’s not just a server on which you put your website. There are more than 50 different microservices working for your platform.

When you are navigating through your website, you use more than five microservices performing different tasks at once. All of them have their own particularities and need to scale in different ways. Databases, search systems, payment methods—all of these scale according to VTEX internal infrastructure and the architecture it chooses.

The reason why VTEX and AWS work so well together is that VTEX’s platform can use the cloud services offered by AWS in the best way. This allows the customer—Grupo Éxito—to manage more requests per second, making a high ticketing event run smoothly and efficiently.

In the case of Día sin IVA, the pattern VTEX followed is the same, anticipating just a bit more and improving the code to optimize for the upcoming sale event.

Results and Benefits

In Colombia, Grupo Éxito has been using VTEX’s marketplace platform capabilities to allow more than 1,000 retailers to connect and sell their products, extend their reach, and ease customer access to an extensive variety of products in a single place.

Together with other features such as VTEX Intelligent Search (a fine-tuning search system), Éxito has received positive feedback by making the migration from Oracle ATG to VTEX. They have also experienced continuous improvements, culminating with the Día sin IVA series.

Orders were managed easily, transactions saw no impediment, and the entire massive online shopping experience was a triple success—for the customer, the partner, and ultimately for every single shopper.

Grupo Éxito is not VTEX’s only Colombian client, so everything that was happening to the store on such a large scale was also occurring nationwide. Since VTEX is a multi-tenant SaaS platform, all of the 3,000 stores on the platform were operating at the same time, without a hitch—even with Colombian merchants, including Éxito, selling at peak volume.

When retail events of such magnitude occur, VTEX merchants such as Grupo Éxito already have the AWS resources they need at the ready. VTEX customers do not need to make further investments in infrastructure, and can grow organically as their computing needs increase without paying for additional resources.

Peak trading periods increase the demand to maintain a scalable and reliable environment for customers using the platform. AWS has worked alongside VTEX through engineering committees, paving the way to successful dialogue with product engineers and product owners at AWS.

The content and opinions in this blog are those of the third-party author and AWS is not responsible for the content or accuracy of this post.

.
VTEX-APN-Blog-CTA-1
.


VTEX – AWS Partner Spotlight

VTEX is an AWS Advanced Technology Partner and multi-tenant commerce platform that unifies customer experiences across all channels into a comprehensive enterprise solution.

Contact VTEX | Partner Overview

*Already worked with VTEX? Rate the Partner

*To review an AWS Partner, you must be a customer that has worked with them directly on a project.

New Connectors in Matillion Data Loader: Google Programmable Search Engine (Google Custom Search) and Couchbase

$
0
0

Feed: Matillion.
Author: Julie Polito
;

Another week, another batch of connectors for Matillion Data Loader! We’re continuing to add our most popular data source connectors to Matillion Data Loader, based on your feedback in the Matillion Data Loader community and other customer interactions. 

Matillion Data Loader is a no-cost, code-free way to extract your data from multiple data sources and load it into your cloud data warehouse or data lake. All Matillion Data Loader connectors have the same or similar functionality to those in our Matillion ETL products. 

Now available: Two more connectors

Once again, we are bringing additional connectors for Matillion ETL into Matillion Data Loader:

Google Programmable Search Engine

Google Programmable Search Engine, formerly Google Custom Search, let’s you place a customizable search engine on your website so visitors can search your site, with an option to search the rest of the web from your site as well. Now you can bring data from the Google custom search engine on your website into your cloud data warehouse with Matillion Data Loader. 

Couchbase

[logo]

Couchbase is an enterprise-class, distributed NoSQL cloud database. It’s a common choice for data teams who need a highly scalable, affordable, in-memory database that enables easy application development in the cloud. Matillion Data Loader now enables you to bring data from Couchbase into your cloud data warehouse in just a few clicks.

Watch this space for more upcoming Matillion Data Loader connectors

We continue to develop and add new connectors to Matillion Data Loader and will have more to share soon. Check back here on the blog for more connector announcements. 


In the meantime, you continue to be our best resource for new connector ideas and Matillion Data Loader features.  If you would like to request new connectors or features, add it to our Ideas Portal. 

Want to try Matillion Data Loader? Sign up today.


If you want to see how Matillion Data Loader can help you get your data from multiple sources into the cloud using a free, no-code solution, sign up today. 

The post New Connectors in Matillion Data Loader: Google Programmable Search Engine (Google Custom Search) and Couchbase appeared first on Matillion.


AWS AppSync Now Available in Asia Pacific (Hong Kong), Middle East (Bahrain) and China (Ningxia)

$
0
0

Feed: Recent Announcements.

AWS AppSync is a fully managed GraphQL service that simplifies application development by letting you create a flexible API to securely access, manipulate, and combine data from one or more data sources. With AppSync, you can build scalable applications, including those requiring real-time updates, on a range of data sources such as NoSQL data stores, relational databases, HTTP APIs, and your custom data sources with AWS Lambda. For mobile and web apps, AppSync additionally provides local data access when devices go offline, and data synchronization with customizable conflict resolution, when they are back online.

With this launch, AppSync is now available in 21 regions globally, US East (N. Virginia and Ohio), US West (Oregon and N. California), Canada (Central), South America (Sao Paulo), EU (Milan, Frankfurt, Ireland, London, Paris and Stockholm), Asia Pacific (Hong Kong, Sydney, Tokyo, Mumbai, Seoul, Singapore), Middle East (Bahrain) and China (Ningxia and Beijing). You can find more information about AWS AppSync in our product page.

The Neo4j BI Connector: Introduction

$
0
0

Feed: Neo4j Graph Database Platform.
Author: David Penick.
Graph database adoption is on the rise. But does this mean that people have to give up their favorite BI tools? The answer is a resounding no.

The Neo4j BI Connector delivers direct access to Neo4j graph data from business intelligence (BI) tools such as Tableau, Looker, TIBCO Spotfire Server and Microstrategy. It’s the first enterprise-ready, supported product to deliver connected data results to BI users.

In this first blog of our five-part series, we cover what the BI Connector does behind the scenes and why business intelligence and graphs are both in high demand.

Feature Image Scalability

The Neo4j BI Connector: Introduction

With the Neo4j BI Connector, you can deliver direct access to Neo4j graph data from business intelligence (BI) tools such as Tableau, Looker, TIBCO Spotfire Server and Microstrategy. The BI Connector is enterprise-ready and supported to deliver seamless, real-time results. avoiding
coding, custom scripting and ungoverned access.

Capabilities

The BI Connector enables data analysts, investigators and data scientists to:

    • Connect to a Neo4j database in real time
    • Select graph data in the same manner as relational and NoSQL data
    • Query using SQL to retrieve data from Neo4j in tabular form
    • Analyze and visualize

Availability

The BI Connector is available at no extra charge for Neo4j Enterprise Edition customers.
Functionally, the product:

    • Builds on the Java Database Connectivity (JDBC) standard
    • Translates SQL into Neo4j’s native, graph-optimized Cypher language
    • Makes connected data insights accessible in real time
    • Is fully supported and ready for production and ready for enterprise deployment

Why BI and Graphs Are in Demand

Business intelligence (BI) tooling has been used for years to inform key decisions. The idea is simply to gather information from around an enterprise, fuse it and build decision-oriented dashboards around that information. This gives executives a view of KPIs and what’s happening throughout a complex enterprise.

Drive Decision-Making with Graph Insights

Neo4j and graph approaches, on the other hand, represent a powerful set of capabilities for getting insight into data. But what use is that insight if it cannot be readily combined with existing decision processes?

The Neo4j BI Connector acts as a bridge that makes it easy to get your graph data into other tooling, but the raw technology isn’t the story. The real benefit lies in improved decision-making based on better information and key graph insights.

Customers get substantial value out of these graph insights just on their own, but they become even more powerful when they are mixed, matched and integrated with other data sources elsewhere in the enterprise.

Connect the Dots within Organizations

In very large organizations, it’s also valuable to share data between organizational units in a simple way. Many Neo4j customers have fraud analytics applications, or other uses of graphs, which are specific to a particular department or project within their enterprise. Business
intelligence, however, is often organized as a cross-functional project elsewhere in the enterprise.

The BI Connector acts as a bridge between these units in the enterprise, making it easy for a project to expose their fraud insights to a different BI group, inform other processes and drive decisions. In this scenario, Neo4j is put on equal footing with other databases or data
warehouses – such as Oracle. Any of these data sources can be used with equal ease to drive dashboards and insights.

Low Code / No Code Integration

Low-code software development trends favor increasing use of BI platforms over time. There has been an explosion of available information, and tooling allows business analysts to contribute without a deep software engineering background. The tooling, the wide base of analyst talent, and just a little bit of SQL are enablers for getting value out of data. Exposing graph data in a way that is friendly to the relational / BI world simply adds fuel to the fire.

Prior to the BI Connector, graph data was accessible to those who knew Cypher and had graph tooling, but harder to access for non-graph users. Custom code was required, and the state of the art was to develop scripts to export data to CSV periodically.

Conclusion

BI tools are gaining traction across the business, and so are graph databases that store data with all of its connections. The BI Connector bridges the gap between the tools people love and the query language those tools use (SQL) and the growing universe of data stored in graph databases like Neo4j.

Next week, in blog two of our five-part series on the BI Connector, we will cover some of the ways people use the BI Connector, from fraud detection to business impact planning to retail sales.

Creating a source to Lakehouse data replication pipe using Apache Hudi, AWS Glue, AWS DMS, and Amazon Redshift

$
0
0

Feed: AWS Big Data Blog.

Most customers have their applications backed by various sql and nosql systems on prem and on cloud. Since the data is in various independent systems, customers struggle to derive meaningful info by combining data from all of these sources. Hence, customers create data lakes to bring their data in a single place.

Typically, a replication tool such as AWS Database Migration Service (AWS DMS) can replicate the data from your source systems to Amazon Simple Storage Service (Amazon S3). When the data is in Amazon S3, customers process it based on their requirements. A typical requirement is to sync the data in Amazon S3 with the updates on the source systems. Although it’s easy to apply updates on a relational database management system (RDBMS) that backs an online source application, it’s tough to apply this change data capture (CDC) process on your data lakes. Apache Hudi is a good way to solve this problem. Currently, you can use Hudi on Amazon EMR to create Hudi tables.

In this post, we use Apache Hudi to create tables in the AWS Glue Data Catalog using AWS Glue jobs. AWS Glue is a fully managed extract, transform, and load (ETL) service that makes it easy to prepare and load your data for analytics. This post enables you to take advantage of the serverless architecture of AWS Glue while upserting data in your data lake, hassle-free.

To write to Hudi tables using AWS Glue jobs, we use a JAR file created using open-source Apache Hudi. This JAR file is used as a dependency in the AWS Glue jobs created through the AWS CloudFormation template provided in this post. Steps to create the JAR file are included in the appendix.

The following diagram illustrates the architecture the CloudFormation template implements.

Prerequisites

The CloudFormation template requires you to select an Amazon Elastic Compute Cloud (Amazon EC2) key pair. This key is configured on an EC2 instance that lives in the public subnet. We use this EC2 instance to get to the Aurora cluster that lives in the private subnet. Make sure you have a key in the Region where you deploy the template. If you don’t have one, you can create a new key pair.

Solution overview

The following are the high-level implementation steps:

  1. Create a CloudFormation stack using the provided template.
  2. Connect to the Amazon Aurora cluster used as a source for this post.
  3. Run InitLoad_TestStep1.sql, in the source Amazon Aurora cluster, to create a schema and a table.

AWS DMS replicates the data from the Aurora cluster to the raw S3 bucket. AWS DMS supports a variety of sources.
The CloudFormation stack creates an AWS Glue job (HudiJob) that is scheduled to run at a frequency set in the ScheduleToRunGlueJob parameter of the CloudFormation stack. This job reads the data from the raw S3 bucket, writes to the Curated S3 bucket, and creates a Hudi table in the Data Catalog. The job also creates an Amazon Redshift external schema in the Amazon Redshift cluster created by the CloudFormation stack.

  1. You can now query the Hudi table in Amazon Athena or Amazon Redshift. Visit Creating external tables for data managed in Apache Hudi or Considerations and Limitations to query Apache Hudi datasets in Amazon Athena for details.
  2. Run IncrementalUpdatesAndInserts_TestStep2.sql on the source Aurora cluster.

This incremental data is also replicated to the raw S3 bucket through AWS DMS. HudiJob picks up the incremental data, using AWS Glue bookmarks, and applies it to the Hudi table created earlier.

  1. You can now query the changed data.

Creating your CloudFormation stack

Click on the Launch Stack button to get started and provide the following parameters:

Parameter Description
VpcCIDR CIDR range for the VPC.
PrivateSubnet1CIDR CIDR range for the first private subnet.
PrivateSubnet2CIDR CIDR range for the second private subnet.
PublicSubnetCIDR CIDR range for the public subnet.
AuroraDBMasterUserPassword Primary user password for the Aurora cluster.
RedshiftDWMasterUserPassword Primary user password for the Amazon Redshift data warehouse.
KeyName The EC2 key pair to be configured in the EC2 instance on the public subnet. This EC2 instance is used to get to the Aurora cluster in the private subnet. Select the value from the dropdown.
ClientIPCIDR Your IP address in CIDR notation. The CloudFormation template creates a security group rule that grants ingress on port 22 to this IP address. On a Mac, you can run the following command to get your IP address: curl ipecho.net/plain ; echo /32
EC2ImageId The image ID used to create the EC2 instance in the public subnet to be a jump box to connect to the source Aurora cluster. If you supply your image ID, the template uses it to create the EC2 instance.
HudiStorageType This is used by the AWS Glue job to determine if you want to create a CoW or MoR storage type table. Enter MoR if you want to create MoR storage type tables.
ScheduleToRunGlueJob The AWS Glue job runs on a schedule to pick the new files and load to the curated bucket. This parameter sets the schedule of the job.
DMSBatchUnloadIntervalInSecs AWS DMS batches the inputs from the source and loads the output to the taw bucket. This parameter defines the frequency in which the data is loaded to the raw bucket.
GlueJobDPUs The number of DPUs that are assigned to the two AWS Glue jobs.

To simplify running the template, your account is given permissions on the key used to encrypt the resources in the CloudFormation template. You can restrict that to the role if desired.

Granting Lake Formation permissions

AWS Lake Formation enables customers to set up fine grained access control for their Datalake. Detail steps to set up AWS Lake Formation can be found here.

Setting up AWS Lake Formation is out of scope for this post. However, if you have Lake Formation configured in the Region where you’re deploying this template, grant Create database permission to the LakeHouseExecuteGlueHudiJobRole role after the CloudFormation stack is successfully created.

This will ensure that you don’t get the following error while running your AWS Glue job.

org.apache.spark.sql.AnalysisException: org.apache.hadoop.hive.ql.metadata.HiveException: MetaException(message:Insufficient Lake Formation permission(s) on global_temp

Similarly grant Describe permission to the LakeHouseExecuteGlueHudiJobRole role on default database.

This will ensure that you don’t get the following error while running your AWS Glue job.

AnalysisException: 'java.lang.RuntimeException: MetaException(message:Unable to verify existence of default database: com.amazonaws.services.glue.model.AccessDeniedException: Insufficient Lake Formation permission(s) on default (Service: AWSGlue; Status Code: 400; Error Code: AccessDeniedException;

Connecting to source Aurora cluster

To connect to source Aurora cluster using SQL Workbench, complete the following steps:

  1. On SQL Workbench, under File, choose Connect window.

  1. Choose Manage Drivers.

  1. Choose PostgreSQL.
  2. For Library, use the driver JAR file.
  3. For Classname, enter org.postgresql.Driver.
  4. For Sample URL, enter jdbc:postgresql://host:port/name_of_database.

  1. Click the Create a new connection profile button.
  2. For Driver, choose your new PostgreSQL driver.
  3. For URL, enter lakehouse_source_db after port/.
  4. For Username, enter postgres.
  5. For Password, enter the same password that you used for the AuroraDBMasterUserPassword parameter while creating the CloudFormation stack.
  6. Choose SSH.
  7. On the Outputs tab of your CloudFormation stack, copy the IP address next to PublicIPOfEC2InstanceForTunnel and enter it for SSH hostname.
  8. For SSH port, enter 22.
  9. For Username, enter ec2-user.
  10. For Private key file, enter the private key for the public key chosen in the KeyName parameter of the CloudFormation stack.
  11. For Local port, enter any available local port number.
  12. On the Outputs tab of your stack, copy the value next to EndpointOfAuroraCluster and enter it for DB hostname.
  13. For DB port, enter 5432.
  14. Select Rewrite JDBC URL.


Checking the Rewrite JDBC URL checkbox will automatically feed in the value of host and port in the URL text box as shown below.

  1. Test the connection and make sure that you get a message that the connection was successful.


Troubleshooting

Complete the following steps if you receive this message: Could not initialize SSH tunnel: java.net.ConnectException: Operation timed out (Connection timed out)

  1. Go to your CloudFormation stack and search for LakeHouseSecurityGroup under Resources .
  2. Choose the link in the Physical ID.

  1. Select your security group.
  2. From the Actions menu, choose Edit inbound rules.

  1. Look for the rule with the description:Rule to allow connection from the SQL client to the EC2 instance used as jump box for SSH tunnel
  2. From the Source menu, choose My IP.
  3. Choose Save rules.

  1. Test the connection from your SQL Workbench again and make sure that you get a successful message.

Running the initial load script

You’re now ready to run the InitLoad_TestStep1.sql script to create some test data.

  1. Open InitLoad_TestStep1.sql in your SQL client and run it.

The output shows that 11 statements have been run.

AWS DMS replicates these inserts to your raw S3 bucket at the frequency set in the DMSBatchUnloadIntervalInSecs parameter of your CloudFormation stack.

  1. On the AWS DMS console, choose the lakehouse-aurora-src-to-raw-s3-tgt task:
  2. On the Table statistics tab, you should see the seven full load rows of employee_details have been replicated.

The lakehouse-aurora-src-to-raw-s3-tgt replication task has the following table mapping with transformation to add a schema name and a table name as additional columns:

{
   "rules":[
      {
         "rule-type":"selection",
         "rule-id":"1",
         "rule-name":"1",
         "object-locator":{
            "schema-name":"human_resources",
            "table-name":"%"
         },
         "rule-action":"include",
         "filters":[
            
         ]
      },
      {
         "rule-type":"transformation",
         "rule-id":"2",
         "rule-name":"2",
         "rule-target":"column",
         "object-locator":{
            "schema-name":"%",
            "table-name":"%"
         },
         "rule-action":"add-column",
         "value":"schema_name",
         "expression":"$SCHEMA_NAME_VAR",
         "data-type":{
            "type":"string",
            "length":50
         }
      },
      {
         "rule-type":"transformation",
         "rule-id":"3",
         "rule-name":"3",
         "rule-target":"column",
         "object-locator":{
            "schema-name":"%",
            "table-name":"%"
         },
         "rule-action":"add-column",
         "value":"table_name",
         "expression":"$TABLE_NAME_VAR",
         "data-type":{
            "type":"string",
            "length":50
         }
      }
   ]
}

These settings put the name of the source schema and table as two additional columns in the output Parquet file of AWS DMS.
These columns are used in the AWS Glue HudiJob to find out the tables that have new inserts, updates, or deletes.

  1. On the Resources tab of the CloudFormation stack, locate RawS3Bucket.
  2. Choose the Physical ID link.

  1. Navigate to human_resources/employee_details.

The LOAD00000001.parquet file is created under human_resources/employee_details. (The name of your raw bucket is different from the following screenshot).

You can also see the time of creation of this file. You should have at least one successful run of the AWS Glue job (HudiJob) after this time for the Hudi table to be created. The AWS Glue job is configured to load this data into the curated bucket at the frequency set in the ScheduleToRunGlueJob parameter of your CloudFormation stack. The default is 5 minutes.

AWS Glue job HudiJob

The following code is the script for HudiJob:

import sys
import os
import json

from pyspark.context import SparkContext
from pyspark.sql.session import SparkSession
from pyspark.sql.functions import concat, col, lit, to_timestamp

from awsglue.utils import getResolvedOptions
from awsglue.context import GlueContext
from awsglue.job import Job
from awsglue.dynamicframe import DynamicFrame

import boto3
from botocore.exceptions import ClientError

args = getResolvedOptions(sys.argv, ['JOB_NAME'])

spark = SparkSession.builder.config('spark.serializer','org.apache.spark.serializer.KryoSerializer').getOrCreate()
glueContext = GlueContext(spark.sparkContext)
job = Job(glueContext)
job.init(args['JOB_NAME'], args)
logger = glueContext.get_logger()

logger.info('Initialization.')
glueClient = boto3.client('glue')
ssmClient = boto3.client('ssm')
redshiftDataClient = boto3.client('redshift-data')

logger.info('Fetching configuration.')
region = os.environ['AWS_DEFAULT_REGION']

curatedS3BucketName = ssmClient.get_parameter(Name='lakehouse-curated-s3-bucket-name')['Parameter']['Value']
rawS3BucketName = ssmClient.get_parameter(Name='lakehouse-raw-s3-bucket-name')['Parameter']['Value']
hudiStorageType = ssmClient.get_parameter(Name='lakehouse-hudi-storage-type')['Parameter']['Value']

dropColumnList = ['db','table_name','Op']

logger.info('Getting list of schema.tables that have changed.')
changeTableListDyf = glueContext.create_dynamic_frame_from_options(connection_type = 's3', connection_options = {'paths': ['s3://'+rawS3BucketName], 'groupFiles': 'inPartition', 'recurse':True}, format = 'parquet', format_options={}, transformation_ctx = 'changeTableListDyf')

logger.info('Processing starts.')
if(changeTableListDyf.count() > 0):
    logger.info('Got new files to process.')
    changeTableList = changeTableListDyf.toDF().select('schema_name','table_name').distinct().rdd.map(lambda row : row.asDict()).collect()

    for dbName in set([d['schema_name'] for d in changeTableList]):
        spark.sql('CREATE DATABASE IF NOT EXISTS ' + dbName)
        redshiftDataClient.execute_statement(ClusterIdentifier='lakehouse-redshift-cluster', Database='lakehouse_dw', DbUser='rs_admin', Sql='CREATE EXTERNAL SCHEMA IF NOT EXISTS ' + dbName + ' FROM DATA CATALOG DATABASE '' + dbName + '' REGION '' + region + '' IAM_ROLE '' + boto3.client('iam').get_role(RoleName='LakeHouseRedshiftGlueAccessRole')['Role']['Arn'] + ''')

    for i in changeTableList:
        logger.info('Looping for ' + i['schema_name'] + '.' + i['table_name'])
        dbName = i['schema_name']
        tableNameCatalogCheck = ''
        tableName = i['table_name']
        if(hudiStorageType == 'MoR'):
            tableNameCatalogCheck = i['table_name'] + '_ro' #Assumption is that if _ro table exists then _rt table will also exist. Hence we are checking only for _ro.
        else:
            tableNameCatalogCheck = i['table_name'] #The default config in the CF template is CoW. So assumption is that if the user hasn't explicitly requested to create MoR storage type table then we will create CoW tables. Again, if the user overwrites the config with any value other than 'MoR' we will create CoW storage type tables.
        isTableExists = False
        isPrimaryKey = False
        isPartitionKey = False
        primaryKey = ''
        partitionKey = ''
        try:
            glueClient.get_table(DatabaseName=dbName,Name=tableNameCatalogCheck)
            isTableExists = True
            logger.info(dbName + '.' + tableNameCatalogCheck + ' exists.')
        except ClientError as e:
            if e.response['Error']['Code'] == 'EntityNotFoundException':
                isTableExists = False
                logger.info(dbName + '.' + tableNameCatalogCheck + ' does not exist. Table will be created.')
        try:
            table_config = json.loads(ssmClient.get_parameter(Name='lakehouse-table-' + dbName + '.' + tableName)['Parameter']['Value'])
            try:
                primaryKey = table_config['primaryKey']
                isPrimaryKey = True
                logger.info('Primary key:' + primaryKey)
            except KeyError as e:
                isPrimaryKey = False
                logger.info('Primary key not found. An append only glueparquet table will be created.')
            try:
                partitionKey = table_config['partitionKey']
                isPartitionKey = True
                logger.info('Partition key:' + partitionKey)
            except KeyError as e:
                isPartitionKey = False
                logger.info('Partition key not found. Partitions will not be created.')
        except ClientError as e:    
            if e.response['Error']['Code'] == 'ParameterNotFound':
                isPrimaryKey = False
                isPartitionKey = False
                logger.info('Config for ' + dbName + '.' + tableName + ' not found in parameter store. Non partitioned append only table will be created.')

        inputDyf = glueContext.create_dynamic_frame_from_options(connection_type = 's3', connection_options = {'paths': ['s3://' + rawS3BucketName + '/' + dbName + '/' + tableName], 'groupFiles': 'none', 'recurse':True}, format = 'parquet',transformation_ctx = tableName)
        
        inputDf = inputDyf.toDF().withColumn('update_ts_dms',to_timestamp(col('update_ts_dms')))
        
        targetPath = 's3://' + curatedS3BucketName + '/' + dbName + '/' + tableName

        morConfig = {'hoodie.datasource.write.storage.type': 'MERGE_ON_READ', 'hoodie.compact.inline': 'false', 'hoodie.compact.inline.max.delta.commits': 20, 'hoodie.parquet.small.file.limit': 0}

        commonConfig = {'className' : 'org.apache.hudi', 'hoodie.datasource.hive_sync.use_jdbc':'false', 'hoodie.datasource.write.precombine.field': 'update_ts_dms', 'hoodie.datasource.write.recordkey.field': primaryKey, 'hoodie.table.name': tableName, 'hoodie.consistency.check.enabled': 'true', 'hoodie.datasource.hive_sync.database': dbName, 'hoodie.datasource.hive_sync.table': tableName, 'hoodie.datasource.hive_sync.enable': 'true'}

        partitionDataConfig = {'hoodie.datasource.write.partitionpath.field': partitionKey, 'hoodie.datasource.hive_sync.partition_extractor_class': 'org.apache.hudi.hive.MultiPartKeysValueExtractor', 'hoodie.datasource.hive_sync.partition_fields': partitionKey}
                     
        unpartitionDataConfig = {'hoodie.datasource.hive_sync.partition_extractor_class': 'org.apache.hudi.hive.NonPartitionedExtractor', 'hoodie.datasource.write.keygenerator.class': 'org.apache.hudi.keygen.NonpartitionedKeyGenerator'}
        
        incrementalConfig = {'hoodie.upsert.shuffle.parallelism': 20, 'hoodie.datasource.write.operation': 'upsert', 'hoodie.cleaner.policy': 'KEEP_LATEST_COMMITS', 'hoodie.cleaner.commits.retained': 10}
        
        initLoadConfig = {'hoodie.bulkinsert.shuffle.parallelism': 3, 'hoodie.datasource.write.operation': 'bulk_insert'}
        
        deleteDataConfig = {'hoodie.datasource.write.payload.class': 'org.apache.hudi.common.model.EmptyHoodieRecordPayload'}

        if(hudiStorageType == 'MoR'):
            commonConfig = {**commonConfig, **morConfig}
            logger.info('MoR config appended to commonConfig.')
        
        combinedConf = {}

        if(isPrimaryKey):
            logger.info('Going the Hudi way.')
            if(isTableExists):
                logger.info('Incremental load.')
                outputDf = inputDf.filter("Op != 'D'").drop(*dropColumnList)
                if outputDf.count() > 0:
                    logger.info('Upserting data.')
                    if (isPartitionKey):
                        logger.info('Writing to partitioned Hudi table.')
                        outputDf = outputDf.withColumn(partitionKey,concat(lit(partitionKey+'='),col(partitionKey)))
                        combinedConf = {**commonConfig, **partitionDataConfig, **incrementalConfig}
                        outputDf.write.format('org.apache.hudi').options(**combinedConf).mode('Append').save(targetPath)
                    else:
                        logger.info('Writing to unpartitioned Hudi table.')
                        combinedConf = {**commonConfig, **unpartitionDataConfig, **incrementalConfig}
                        outputDf.write.format('org.apache.hudi').options(**combinedConf).mode('Append').save(targetPath)
                outputDf_deleted = inputDf.filter("Op = 'D'").drop(*dropColumnList)
                if outputDf_deleted.count() > 0:
                    logger.info('Some data got deleted.')
                    if (isPartitionKey):
                        logger.info('Deleting from partitioned Hudi table.')
                        outputDf_deleted = outputDf_deleted.withColumn(partitionKey,concat(lit(partitionKey+'='),col(partitionKey)))
                        combinedConf = {**commonConfig, **partitionDataConfig, **incrementalConfig, **deleteDataConfig}
                        outputDf_deleted.write.format('org.apache.hudi').options(**combinedConf).mode('Append').save(targetPath)
                    else:
                        logger.info('Deleting from unpartitioned Hudi table.')
                        combinedConf = {**commonConfig, **unpartitionDataConfig, **incrementalConfig, **deleteDataConfig}
                        outputDf_deleted.write.format('org.apache.hudi').options(**combinedConf).mode('Append').save(targetPath)
            else:
                outputDf = inputDf.drop(*dropColumnList)
                if outputDf.count() > 0:
                    logger.info('Inital load.')
                    if (isPartitionKey):
                        logger.info('Writing to partitioned Hudi table.')
                        outputDf = outputDf.withColumn(partitionKey,concat(lit(partitionKey+'='),col(partitionKey)))
                        combinedConf = {**commonConfig, **partitionDataConfig, **initLoadConfig}
                        outputDf.write.format('org.apache.hudi').options(**combinedConf).mode('Overwrite').save(targetPath)
                    else:
                        logger.info('Writing to unpartitioned Hudi table.')
                        combinedConf = {**commonConfig, **unpartitionDataConfig, **initLoadConfig}
                        outputDf.write.format('org.apache.hudi').options(**combinedConf).mode('Overwrite').save(targetPath)
        else:
            if (isPartitionKey):
                logger.info('Writing to partitioned glueparquet table.')
                sink = glueContext.getSink(connection_type = 's3', path= targetPath, enableUpdateCatalog = True, updateBehavior = 'UPDATE_IN_DATABASE', partitionKeys=[partitionKey])
            else:
                logger.info('Writing to unpartitioned glueparquet table.')
                sink = glueContext.getSink(connection_type = 's3', path= targetPath, enableUpdateCatalog = True, updateBehavior = 'UPDATE_IN_DATABASE')
            sink.setFormat('glueparquet')
            sink.setCatalogInfo(catalogDatabase = dbName, catalogTableName = tableName)
            outputDyf = DynamicFrame.fromDF(inputDf.drop(*dropColumnList), glueContext, 'outputDyf')
            sink.writeFrame(outputDyf)

job.commit()

Hudi tables need a primary key to perform upserts. Hudi tables can also be partitioned based on a certain key. We get the names of the primary key and the partition key from AWS Systems Manager Parameter Store.

The HudiJob script looks for an AWS Systems Manager Parameter with the naming format lakehouse-table-<schema_name>.<table_name>. It compares the name of the parameter with the name of the schema and table columns, added by AWS DMS, to get the primary key and the partition key for the Hudi table.

The CloudFormation template creates lakehouse-table-human_resources.employee_details AWS Systems Manager Parameter, as shown on the Resources tab.

If you choose the Physical ID link, you can locate the value of the AWS Systems Manager Parameter. The AWS Systems Manager Parameter has {"primaryKey": "emp_no", "partitionKey": "department"} value in it.

Because of the value in the lakehouse-table-human_resources.employee_details AWS Systems Manager Parameter, the AWS Glue script creates a human_resources.employee_details Hudi table partitioned on the department column for the employee_details table created in the source using the InitLoad_TestStep1.sql script. The HudiJob also uses the emp_no column as the primary key for upserts.

If you reuse this CloudFormation template and create your own table, you have to create an associated AWS Systems Manager Parameter with the naming convention lakehouse-table-<schema_name>.<table_name>. Keep in mind the following:

  • If you don’t create a parameter, the script creates an unpartitioned glueparquet append-only table.
  • If you create a parameter that only has the primaryKey part in the value, the script creates an unpartitioned Hudi table.
  • If you create a parameter that only has the partitionKey part in the value, the script creates a partitioned glueparquet append-only table.

If you have too many tables to replicate, you can also store the primary key and partition key configuration in Amazon DynamoDB or Amazon S3 and change the code accordingly.

In the InitLoad_TestStep1.sql script, replica identity for human_resources.employee_details table is set to full. This makes sure that AWS DMS transfers the full delete record to Amazon S3. Having this delete record is important for the HudiJob script to delete the record from the Hudi table. A full delete record from AWS DMS for the human_resources.employee_details table looks like the following:

{ "Op": "D", "update_ts_dms": "2020-10-25 07:57:48.589284", "emp_no": 3, "name": "Jeff", "department": "Finance", "city": "Tokyo", "salary": 55000, "schema_name": "human_resources", "table_name": "employee_details"}

The schema_name, and table_name columns are added by AWS DMS because of the task configuration shared previously.update_ts_dms has been set as the value for TimestampColumnName S3 setting in AWS DMS S3 Endpoint.Op is added by AWS DMS for cdc and it indicates source DB operations in migrated S3 data.

We also set spark.serializer in the script. This setting is required for Hudi.

In HudiJob script, you can also find a few Python dict that store various Hudi configuration properties. These configurations are just for demo purposes; you have to adjust them based on your workload. For more information about Hudi configurations, see Configurations.

HudiJob is scheduled to run every 5 minutes by default. The frequency is set by the ScheduleToRunGlueJob parameter of the CloudFormation template. Make sure that you successfully run HudiJob at least one time after the source data lands in the raw S3 bucket. The screenshot in Step 6 of Running the initial load script section confirms that AWS DMS put the LOAD00000001.parquet file in the raw bucket at 11:54:41 AM and following screenshot confirms that the job execution started at 11:55 AM.

The job creates a Hudi table in the AWS Glue Data Catalog (see the following screenshot). The table is partitioned on the department column.

Granting AWS Lake Formation permissions

If you have AWS Lake Formation enabled, make sure that you grant Select permission on the human_resources.employee_details table to the role/user used to run Athena query. Similarly, you also have to grant Select permission on the human_resources.employee_details table to the LakeHouseRedshiftGlueAccessRole role so you can query human_resources.employee_details in Amazon Redshift.

Grant Drop permission on the human_resources database to LakeHouseExecuteLambdaFnsRole so that the template can delete the database when you delete the template. Also, the CloudFormation template does not roll back any AWS Lake Formation grants or changes that are manually applied.

Granting access to KMS key

The curated S3 bucket is encrypted by lakehouse-key, which is an AWS Key Management Service (AWS KMS) customer managed key created by AWS CloudFormation template.

To run the query in Athena, you have to add the ARN of the role/user used to run the Athena query in the Allow use of the key section in the key policy.

This will ensure that you don’t get com.amazonaws.services.s3.model.AmazonS3Exception: Access Denied (Service: Amazon S3; Status Code: 403; Error Code: AccessDenied; error while running your Athena query.

You might not have to execute the above KMS policy change if you have kept the default of granting access to the AWS account and the role/user used to run Athena query has the necessary KMS related policies attached to it.

Confirming job completion

When HudiJob is complete, you can see the files in the curated bucket.

  1. On the Resources tab, search for CuratedS3Bucket.
  2. Choose the Physical ID link.

The following screenshot shows the timestamp on the initial load.

  1. Navigate to the department=Finance prefix and select the Parquet file.
  2. Choose Select from.
  1. For File format, select Parquet.
  2. Choose Show file preview.

You can see the value of the timestamp in the update_ts_dms column.

Querying the Hudi table

You can now query your data in Amazon Athena or Amazon Redshift.

Querying in Amazon Athena

Query the human_resources.employee_details table in Amazon Athena with the following code:

SELECT emp_no,
         name,
         city,
         salary,
         department,
         from_unixtime(update_ts_dms/1000000,'America/Los_Angeles') update_ts_dms_LA,
         from_unixtime(update_ts_dms/1000000,'UTC') update_ts_dms_UTC         
FROM "human_resources"."employee_details"
ORDER BY emp_no

The timestamp for all the records matches the timestamp in the update_ts_dms column in the earlier screenshot.

Querying in Redshift Spectrum

Read query your table in Redshift Spectrum for Apache Hudi support in Amazon Redshift.

  1. On the Amazon Redshift console, locate lakehouse-redshift-cluster.
  2. Choose Query cluster.

  1. For Database name, enter lakehouse_dw.
  2. For Database user, enter rs_admin.
  3. For Database password, enter the password that you used for the RedshiftDWMasterUserPassword parameter in the CloudFormation template.

  1. Enter the following query for the human_resources.employee_details table:
    SELECT emp_no,
             name,
             city,
             salary,
             department,
             (TIMESTAMP 'epoch' + update_ts_dms/1000000 * interval '1 second') AT TIME ZONE 'utc' AT TIME ZONE 'america/los_angeles' update_ts_dms_LA,
             (TIMESTAMP 'epoch' + update_ts_dms/1000000 * interval '1 second') AT TIME ZONE 'utc' update_ts_dms_UTC
    FROM human_resources.employee_details
    ORDER BY emp_no 

The following screenshot shows the query output.

Running the incremental load script

We now run the IncrementalUpdatesAndInserts_TestStep2.sql script. The output shows that 6 statements were run.

AWS DMS now shows that it has replicated the new incremental changes. The changes are replicated at a frequency set in DMSBatchUnloadIntervalInSecs parameter of the CloudFormation stack.

This creates another Parquet file in the raw S3 bucket.

The incremental updates are loaded into the Hudi table according to the chosen frequency to run the job (the ScheduleToRunGlueJob parameter). The HudiJobscript uses job bookmarks to find out the incremental load so it only processes the new files brought in through AWS DMS.

Confirming job completion

Make sure that HudiJob runs successfully at least one time after the incremental file arrives in the raw bucket. The previous screenshot shows that the incremental file arrived in the raw bucket at 1:18:38 PM and the following screenshot shows that the job started at 1:20 PM.

Querying the changed data

You can now check the table in Athena and Amazon Redshift. Both results show that emp_no 3 is deleted, 8 and 9 have been added, and 2 and 5 have been updated.

The following screenshot shows the results in Athena.

The following screenshot shows the results in Redshift Spectrum.

AWS Glue Job HudiMoRCompactionJob

The CloudFormation template also deploys the AWS Glue job HudiMoRCompactionJob. This job is not scheduled; you only use it if you choose the MoR storage type. To execute the pipe for MoR storage type instead of CoW storage type, delete the CloudFormation stack and create it again. After creation, replace CoW in lakehouse-hudi-storage-type AWS Systems Manager Parameter with MoR.

If you use MoR storage type, the incremental updates are stored in log files. You can’t see the updates in the _ro (read optimized) view, but can see them in the _rt view. Amazon Athena documentation and Amazon Redshift documentation gives more details about support and considerations for Apache Hudi.

To see the incremental data in the _ro view, run the HudiMoRCompactionJob job. For more information about Hudi storage types and views, see Hudi Dataset Storage Types and Storage Types & Views. The following code is an example of the CLI command used to run HudiMoRCompactionJob job:

aws glue start-job-run --job-name HudiMoRCompactionJob --arguments="--DB_NAME=human_resources","--TABLE_NAME=employee_details","--IS_PARTITIONED=true"

You can decide on the frequency of running this job. You don’t have to run the job immediately after the HudiJob. You should run this job when you want the data to be available in the _ro view. You have to pass the schema name and the table name to this script so it knows the table to compact.

Additional considerations

The JAR file we use in this post has not been tested for AWS Glue streaming jobs. Additionally, there are some hardcoded Hudi options in the HudiJob script. These options are set for the sample table that we create for this post. Update the options based on your workload. 

Conclusion

In this post, we created AWS Glue 2.0 jobs that moved the source upserts and deletes into Hudi tables. The code creates tables in the AWS GLue Data Catalog and updates partitions so you don’t have to run the crawlers to update them.

This post simplified your LakeHouse code base by giving you the benefits of Apache Hudi along with serverless AWS Glue. We also showed how to create an source to LakeHouse replication system using AWS Glue, AWS DMS, and Amazon Redshift with minimum overhead.


Appendix

We can write to Hudi tables because of the hudi-spark.jar file that we downloaded to our DependentJarsAndTempS3Bucket S3 bucket with the CloudFormation template. The path to this file is added as a dependency in both the AWS Glue jobs. This file is based on open-source Hudi. To create the JAR file, complete the following steps:

  1. Get Hudi 0.5.3 and unzip it using the following code:
    wget https://github.com/apache/hudi/archive/release-0.5.3.zip
    unzip hudi-release-0.5.3.zip
  2. Edit Hudi pom.xml:
    vi hudi-release-0.5.3/pom.xml
    1. Remove the following code to make the build process faster:
      <module>packaging/hudi-hadoop-mr-bundle</module>
      <module>packaging/hudi-hive-bundle</module>
      <module>packaging/hudi-presto-bundle</module>
      <module>packaging/hudi-utilities-bundle</module>
      <module>packaging/hudi-timeline-server-bundle</module>
      <module>docker/hoodie/hadoop</module>
      <module>hudi-integ-test</module>
    2. Change the versions of all three dependencies of httpcomponents to 4.4.1. The following is the original code:
      <!-- Httpcomponents -->
            <dependency>
              <groupId>org.apache.httpcomponents</groupId>
              <artifactId>fluent-hc</artifactId>
              <version>4.3.2</version>
            </dependency>
            <dependency>
              <groupId>org.apache.httpcomponents</groupId>
              <artifactId>httpcore</artifactId>
              <version>4.3.2</version>
            </dependency>
            <dependency>
              <groupId>org.apache.httpcomponents</groupId>
              <artifactId>httpclient</artifactId>
              <version>4.3.6</version>
            </dependency>

      The following is the replacement code:

      <!-- Httpcomponents -->
            <dependency>
              <groupId>org.apache.httpcomponents</groupId>
              <artifactId>fluent-hc</artifactId>
              <version>4.4.1</version>
            </dependency>
            <dependency>
              <groupId>org.apache.httpcomponents</groupId>
              <artifactId>httpcore</artifactId>
              <version>4.4.1</version>
            </dependency>
            <dependency>
              <groupId>org.apache.httpcomponents</groupId>
              <artifactId>httpclient</artifactId>
              <version>4.4.1</version>
            </dependency>
  3. Build the JAR file:
    mvn clean package -DskipTests -DskipITs -f <Full path of the hudi-release-0.5.3 dir>
  4. You can now get the JAR from the following location:
hudi-release-0.5.3/packaging/hudi-spark-bundle/target/hudi-spark-bundle_2.11-0.5.3-rc2.jar

The other JAR dependency used in the AWS Glue jobs is spark-avro_2.11-2.4.4.jar.


About the Author

Vishal Pathak is a Data Lab Solutions Architect at AWS. Vishal works with the customers on their use cases, architects a solution to solve their business problems and helps the customers build an scalable prototype. Prior to his journey in AWS, Vishal helped customers implement BI, DW and DataLake projects in US and Australia.

AzureTableStor: R interface to Azure table storage service

$
0
0

Feed: R-bloggers.
Author: Hong Ooi.

by Hong Ooi

I’m pleased to announce that the AzureTableStor package, providing a simple yet powerful interface to the Azure table storage service, is now on CRAN. This is something that many people have requested since the initial release of the AzureR packages nearly two years ago.

Azure table storage is a service that stores structured NoSQL data in the cloud, providing a key/attribute store with a schemaless design. Because table storage is schemaless, it’s easy to adapt your data as the needs of your application evolve. Access to table storage data is fast and cost-effective for many types of applications, and is typically lower in cost than traditional SQL for similar volumes of data.

You can use table storage to store flexible datasets like user data for web applications, address books, device information, or other types of metadata your service requires. You can store any number of entities in a table, and a storage account may contain any number of tables, up to the capacity limit of the storage account.

AzureTableStor builds on the functionality provided by the AzureStor package. The table storage service is available both as part of general Azure storage and via Azure Cosmos DB; AzureTableStor is able to work with either.

Tables

AzureTableStor provides a table_endpoint function that is the analogue of AzureStor’s blob_endpoint, file_endpoint and adls_endpoint functions. There are methods for retrieving, creating, listing and deleting tables within the endpoint.

library(AzureTableStor)

# storage account endpoint
endp 

Entities

In table storage jargon, an entity is a row in a table. The columns of the table are properties. Note that table storage does not enforce a schema; that is, individual entities in a table can have different properties. An entity is identified by its RowKey and PartitionKey properties, which must be unique for each entity.

AzureTableStor provides the following functions to work with data in a table:

  • insert_table_entity: inserts a row into the table.
  • update_table_entity: updates a row with new data, or inserts a new row if it doesn’t already exist.
  • get_table_entity: retrieves an individual row from the table.
  • delete_table_entity: deletes a row from the table.
  • import_table_entities: inserts multiple rows of data from a data frame into the table.
insert_table_entity(tab, list(
    RowKey="row1",
    PartitionKey="partition1",
    firstname="Bill",
    lastname="Gates"
))

get_table_entity(tab, "row1", "partition1")

# we can import to the same table as above:
# table storage doesn't enforce a schema
import_table_entities(tab, mtcars,
    row_key=row.names(mtcars),
    partition_key=as.character(mtcars$cyl))

list_table_entities(tab)
list_table_entities(tab, filter="firstname eq 'Satya'")
list_table_entities(tab, filter="RowKey eq 'Toyota Corolla'")

Batch transactions

With the exception of import_table_entities, all of the above entity functions work on a single row of data. Table storage provides a batch execution facility, which lets you bundle up single-row operations into a single transaction that will be executed atomically. In the jargon, this is known as an entity group transaction. import_table_entities is an example of an entity group transaction: it bundles up multiple rows of data into batch jobs, which is much more efficient than sending each row individually to the server.

The create_table_operation, create_batch_transaction and do_batch_transaction functions let you perform entity group transactions. Here is an example of a simple batch insert. The actual import_table_entities function is more complex as it can also handle multiple partition keys and more than 100 rows of data.

ir 

If you have any feedback, or to report bugs with the package, please contact me at or open an issue on GitHub.

The Types of Databases (with Examples)

$
0
0

Feed: Matillion.
Author: Julie Polito
;

Types of databases: Image of a cloud icon and a database icon

Types of databases: Image of a cloud icon and a database icon

Database technology has changed and evolved over the years. Relational, NoSQL, hierarchical…it can start to get confusing. Storing data doesn’t have to be a headache. If you’re trying to pick the right database for your organization, here’s a guide to the properties and uses of each type.

What are the types of databases?

1. Relational databases


Relational databases have been around since the 1970s. The name comes from the way that data is stored in multiple, related tables. Within the tables, data is stored in rows and columns. The relational database management system (RDBMS) is the program that allows you to create, update, and administer a relational database. Structured Query Language (SQL) is the most common language for reading, creating, updating and deleting data. Relational databases are very reliable. They are compliant with ACID (Atomicity, Consistency, Isolation, Durability), which is a standard set of properties for reliable database transactions. Relational databases work well with structured data. Organizations that have a lot of unstructured or semi-structured data should not be considering a relational database.

Examples: Microsoft SQL Server, Oracle Database, MySQL, PostgreSQL and IBM Db2

2. NoSQL databases

NoSQL is a broad category that includes any database that doesn’t use SQL as its primary data access language. These types of databases are also sometimes referred to as non-relational databases. Unlike in relational databases, data in a NoSQL database doesn’t have to conform to a pre-defined schema, so these types of databases are great for organizations seeking to store unstructured or semi-structured data. One advantage of NoSQL databases is that developers can make changes to the database on the fly, without affecting applications that are using the database.

Examples: Apache Cassandra, MongoDB, CouchDB, and CouchBase

3. Cloud databases

A cloud database refers to any database that’s designed to run in the cloud. Like other cloud-based applications, cloud databases offer flexibility and scalability, along with high availability. Cloud databases are also often low-maintenance, since many are offered via a SaaS model.


Examples: Microsoft Azure SQL Database, Amazon Relational Database Service, Oracle Autonomous Database.

4. Columnar databases

Also referred to as column data stores, columnar databases store data in columns rather than rows. These types of databases are often used in data warehouses because they’re great at handling analytical queries. When you’re querying a columnar database, it essentially ignores all of the data that doesn’t apply to the query, because you can retrieve the information from only the columns you want.

Examples: Google BigQuery, Cassandra, HBase, MariaDB, Azure SQL Data Warehouse

5. Wide column databases

Wide column databases, also known as wide column stores, are schema-agnostic. Data is stored in column families, rather than in rows and columns. Highly scalable, wide column databases can handle petabytes of data, making them ideal for supporting real-time big data applications.

Examples: BigTable, Apache Cassandra and Scylla

6. Object-oriented databases

An object-oriented database is based on object-oriented programming, so data and all of its attributes, are tied together as an object. Object-oriented databases are managed by object-oriented database management systems (OODBMS). These databases work well with object-oriented programming languages, such as C++ and Java. Like relational databases, object-oriented databases conform to ACID standards.

Examples: Wakanda, ObjectStore

7. Key-value databases

One of the simplest types of NoSQL databases, key-value databases save data as a group of key-value pairs made up of two data items each. They’re also sometimes referred to as a key-value store. Key-value databases are highly scalable and can handle high volumes of traffic, making them ideal for processes such as session management for web applications, user sessions for massive multi-player online games, and online shopping carts.

Examples: Amazon DynamoDB, Redis

8. Hierarchical databases

Hierarchical databases use a parent-child model to store data. If you were to draw a picture of a hierarchical database, it would look like a family tree, with one object on top branching down to multiple objects beneath it. The one-to-many format is rigid, so child records can’t have more than one parent record. Originally developed by IBM in the early 1960s, hierarchical databases are commonly used to support high-performance and high availability applications.

Examples: IBM Information Management System (IMS), Windows Registry

9. Document databases

Document databases, also known as document stores, use JSON-like documents to model data instead of rows and columns. Sometimes referred to as document-oriented databases, document databases are designed to store and manage document-oriented information, also referred to as semi-structured data. Document databases are simple and scalable, making them useful for mobile apps that need fast iterations.

Examples: MongoDB, Amazon DocumentDB, Apache CouchDB

10. Graph databases

Graph databases are a type of NoSQL database that are based on graph theory. Graph-Oriented Database Management Systems (DBMS) software is designed to identify and work with the connections between data points. Therefore graph databases are often used to analyze the relationships between heterogeneous data points, such as in fraud prevention or for mining data about customers from social media.

Examples: Datastax Enterprise Graph, Neo4J

11. Time series databases

A time series database is a database optimized for time-stamped, or time series, data. Examples of this type of data include network data, sensor data, and application performance monitoring data. All of those Internet of Things sensors that are getting attached to everything put out a constant stream of time series data.

Examples: Druid, eXtremeDB, InfluxDB

Want to learn more about databases and ETL?

Given the increasing volume and complexity of data, and the speed and scale needed to handle it, the only place you can compete effectively—and cost-effectively—is in the cloud. Matillion provides a complete data integration and transformation solution that is purpose-built for the cloud.

Only Matillion ETL is purpose-built for Snowflake, Amazon Redshift, Google BigQuery, Azure Synapse Analytics, and Delta Lake for Databricks, enabling businesses to achieve new levels of simplicity, speed, scale, and savings. Trusted by companies of all sizes to meet their data integration and transformation needs, Matillion products are highly rated across the AWS, GCP, and Microsoft Azure Marketplaces.

Request a demo to learn more about how you can unlock the potential of your data with Matillion’s cloud-based approach to data transformation.

Or check out Matillion Data Loader, a no-cost, code-free way to extract your data from multiple data sources and load it into your cloud data warehouse or data lake. Want to try Matillion Data Loader? Sign up today.

The post The Types of Databases (with Examples) appeared first on Matillion.

Viewing all 521 articles
Browse latest View live